Stop the Scramble, Schedule Your Gram!
Scheduling is your secret weapon to win against the scrambling for last-minute Instagram posts. This blog will show how to schedule Instagram posts using the native Instagram app, Meta Business Suite, and an Instagram scheduling tool.
PS: There is a bonus waiting for you in this blog. So, take your time and dive into this guide to unlock the secrets of Instagram growth.
How to Schedule Instagram Posts ( 4 Ways)
There are numerous ways you can schedule your Instagram posts. Here are different options you can use to schedule your post:
- Native App: Instagram native feature can be used to schedule your posts. While it is successful, it comes with many limitations.
- Meta Business Suite: The second good option is the Meta Business Suite. Meta users can use this to manage their posts, ads, and communications across Facebook, Instagram, and Messenger.
- SocialPilot Tool: You can seamlessly schedule Instagram Reels with SoialPilot. It is very easy and affordable and has various advantages over native features and the meta business suite.
- Mobile App: Meta users can manage their posts, ads, and communications across Facebook, Instagram, and Messenger.
Lets dive in further in this blog and explore more details about the ways to schedule your posts on Instagram.
How to Schedule Post on Instagram App?
Professional accounts on Instagram can use the Instagram mobile application to schedule their Posts, Reels, and Carousels. It is an easy way to schedule your tweets while on the go.
Let’s break down the steps:
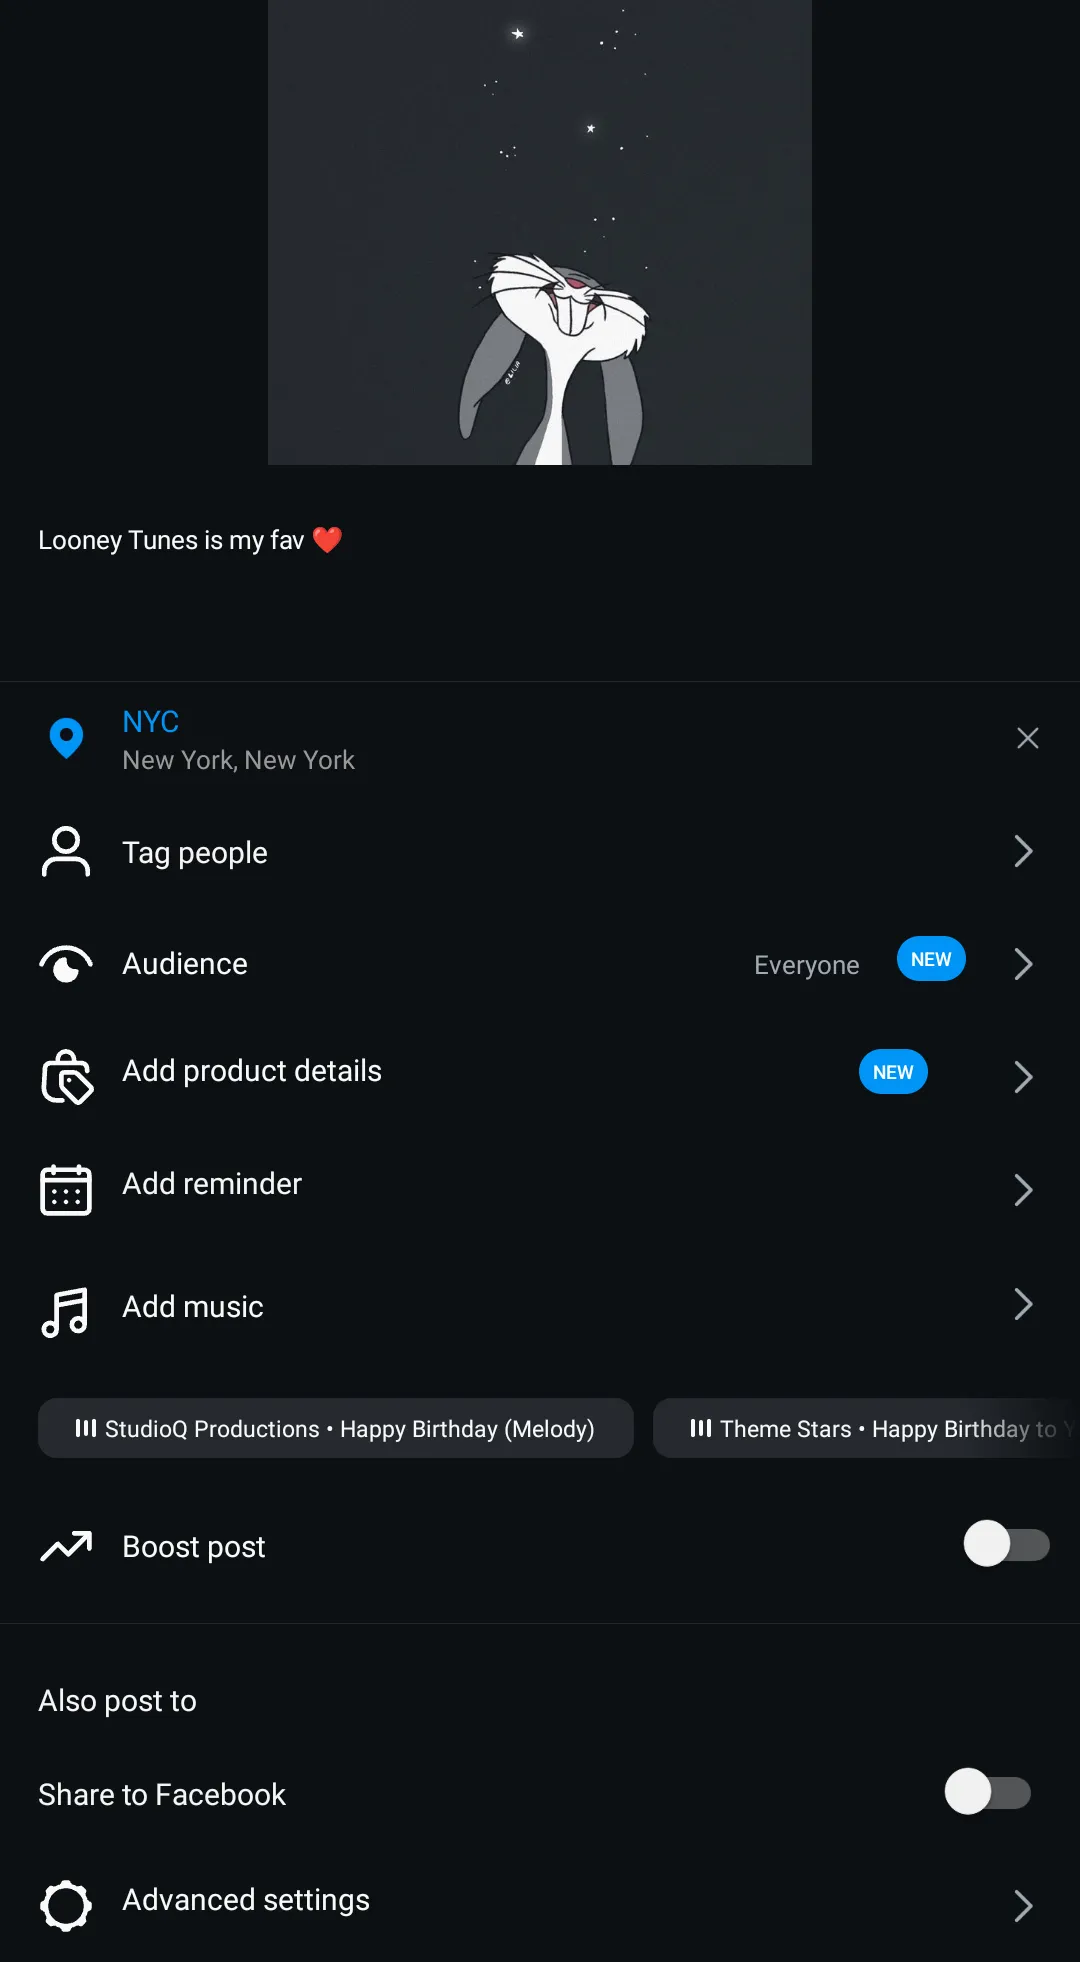
- Open your Instagram mobile application and tap on the “+” icon to upload your Post or Reel.
- Edit your Post or Reel as usual, using the inbuilt editing feature of Instagram, and tap on the next.
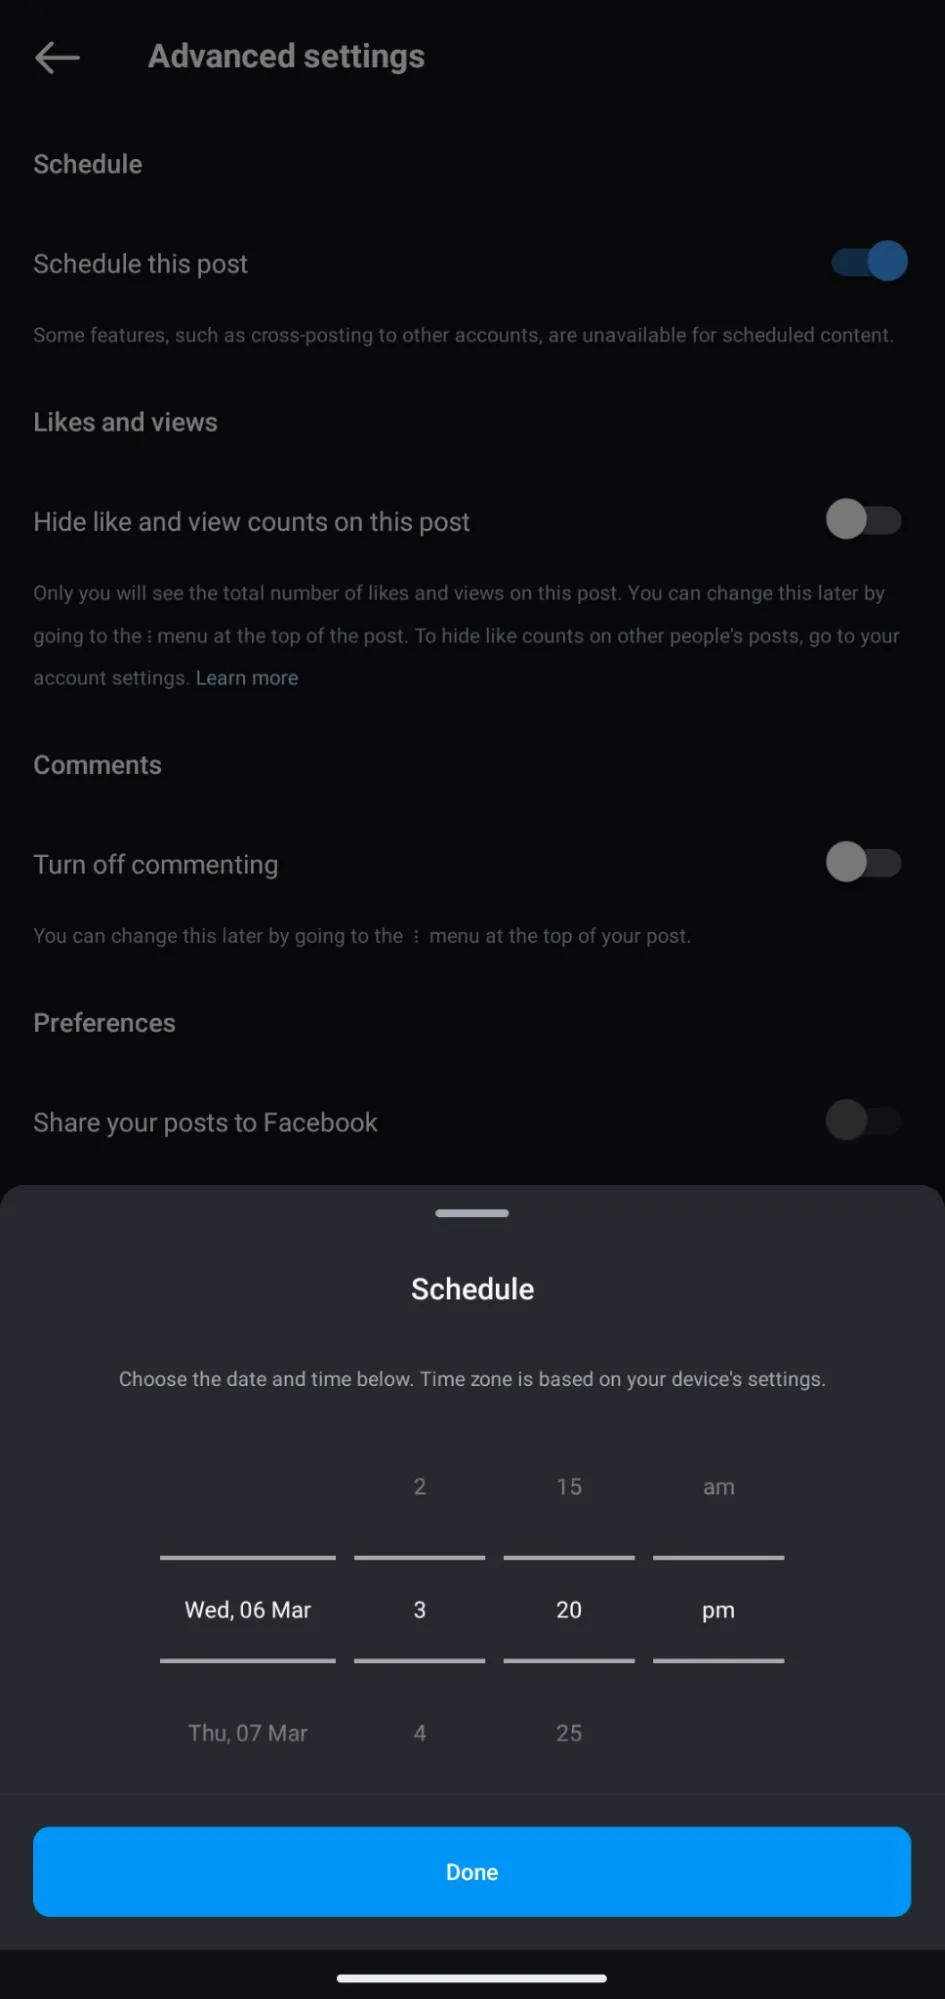
- In the caption window, locate the “Advanced Settings” option and tap on it.
- Toggle on the “Schedule Post” option.
- Select your desired date and time for the post to go live.
- After adding the time and date, tap on “Back (←)” and tap “Share.”
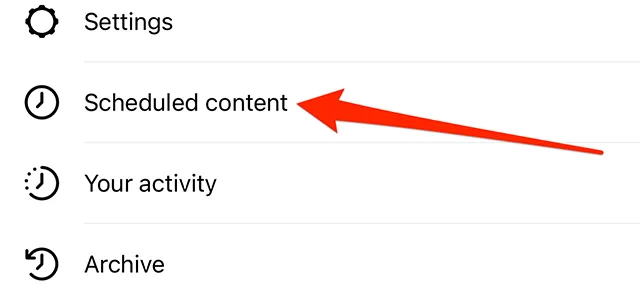
You can view and make edits to your scheduled posts by navigating to the “Schedule Content” section within your account’s “Settings and Privacy” menu.
How to Schedule Instagram Posts Using Meta Business Suite
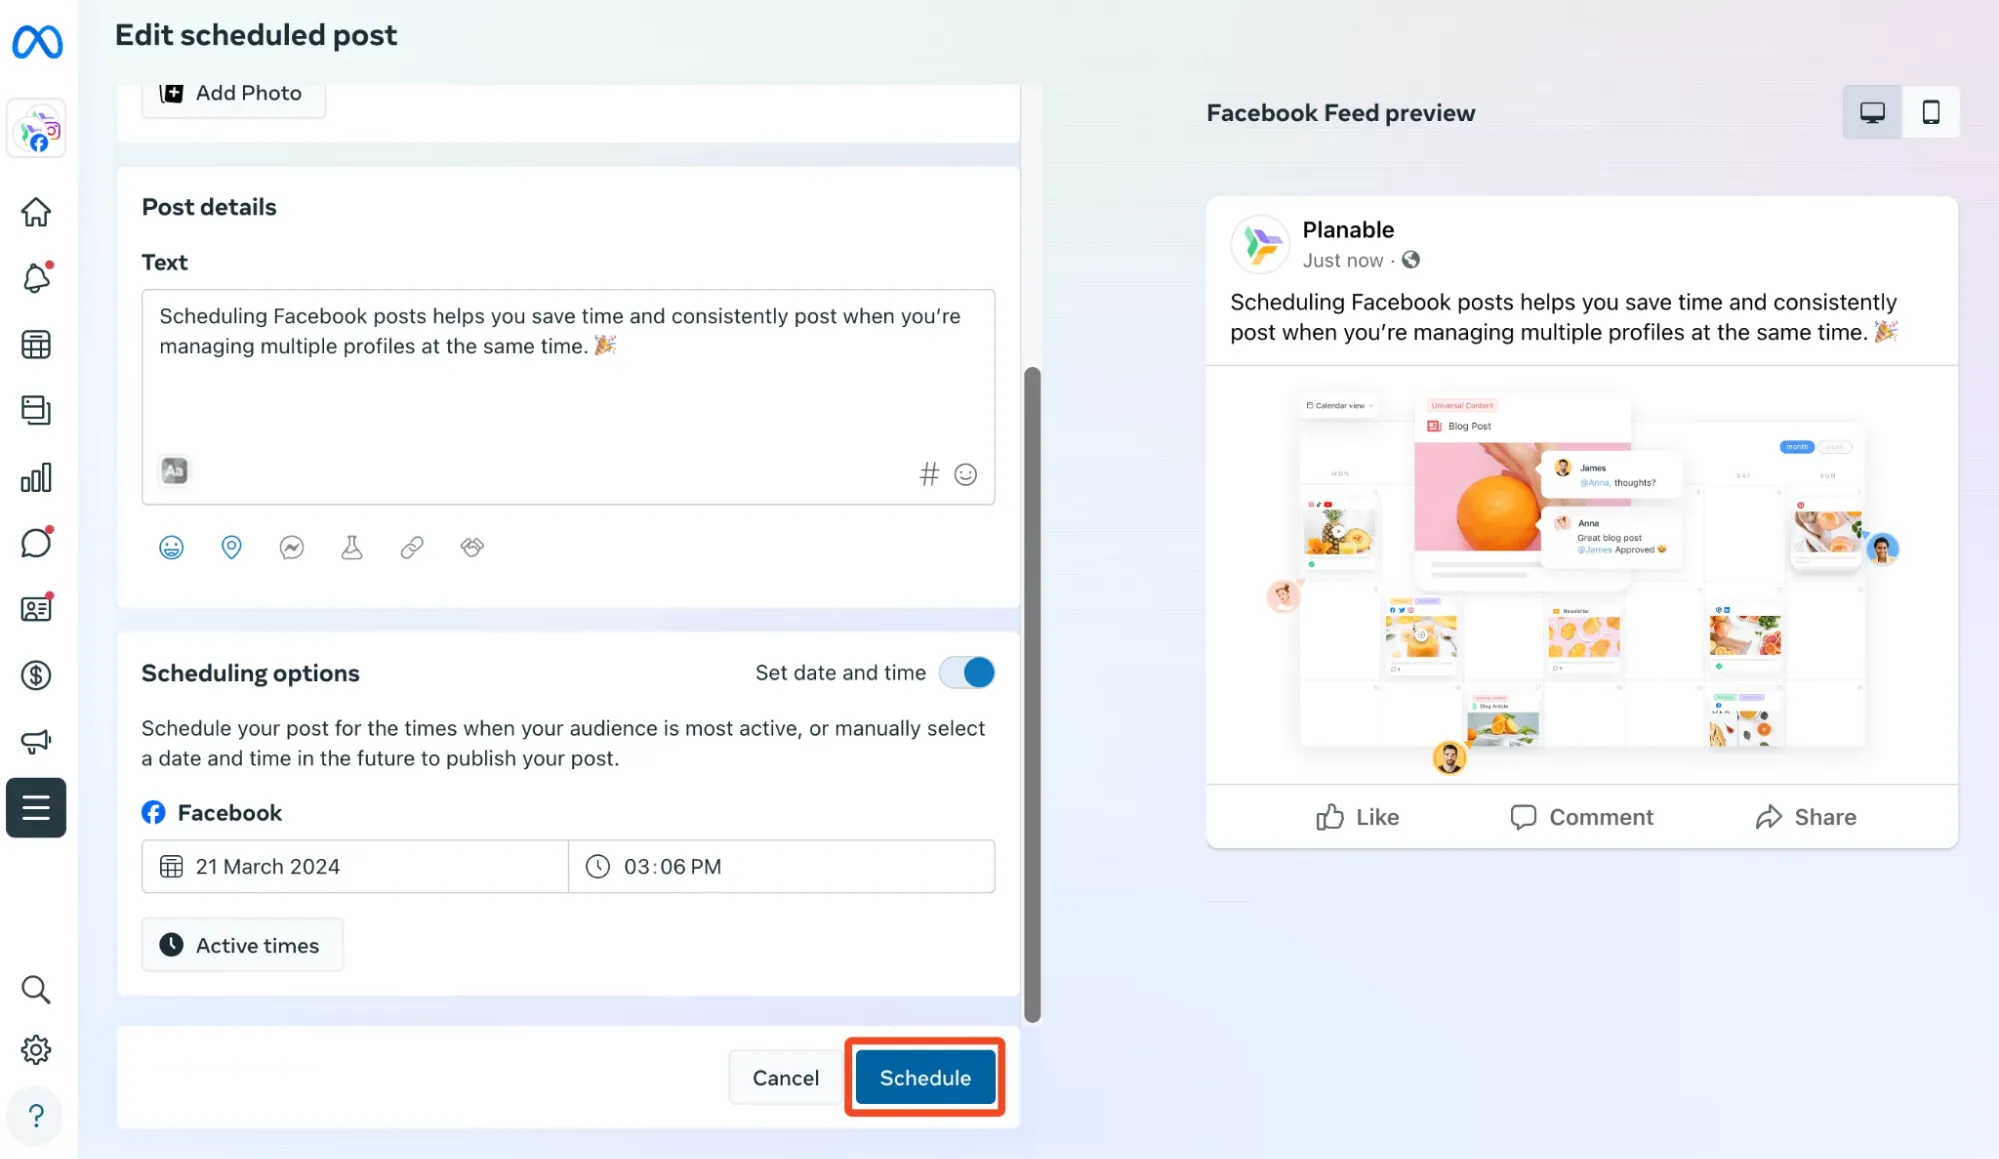
If you have an Instagram business account, then you can use Facebook’s Meta Business Suite to craft and schedule Instagram posts.
Follow these steps to schedule your Instagram posts using Meta Business Suite.
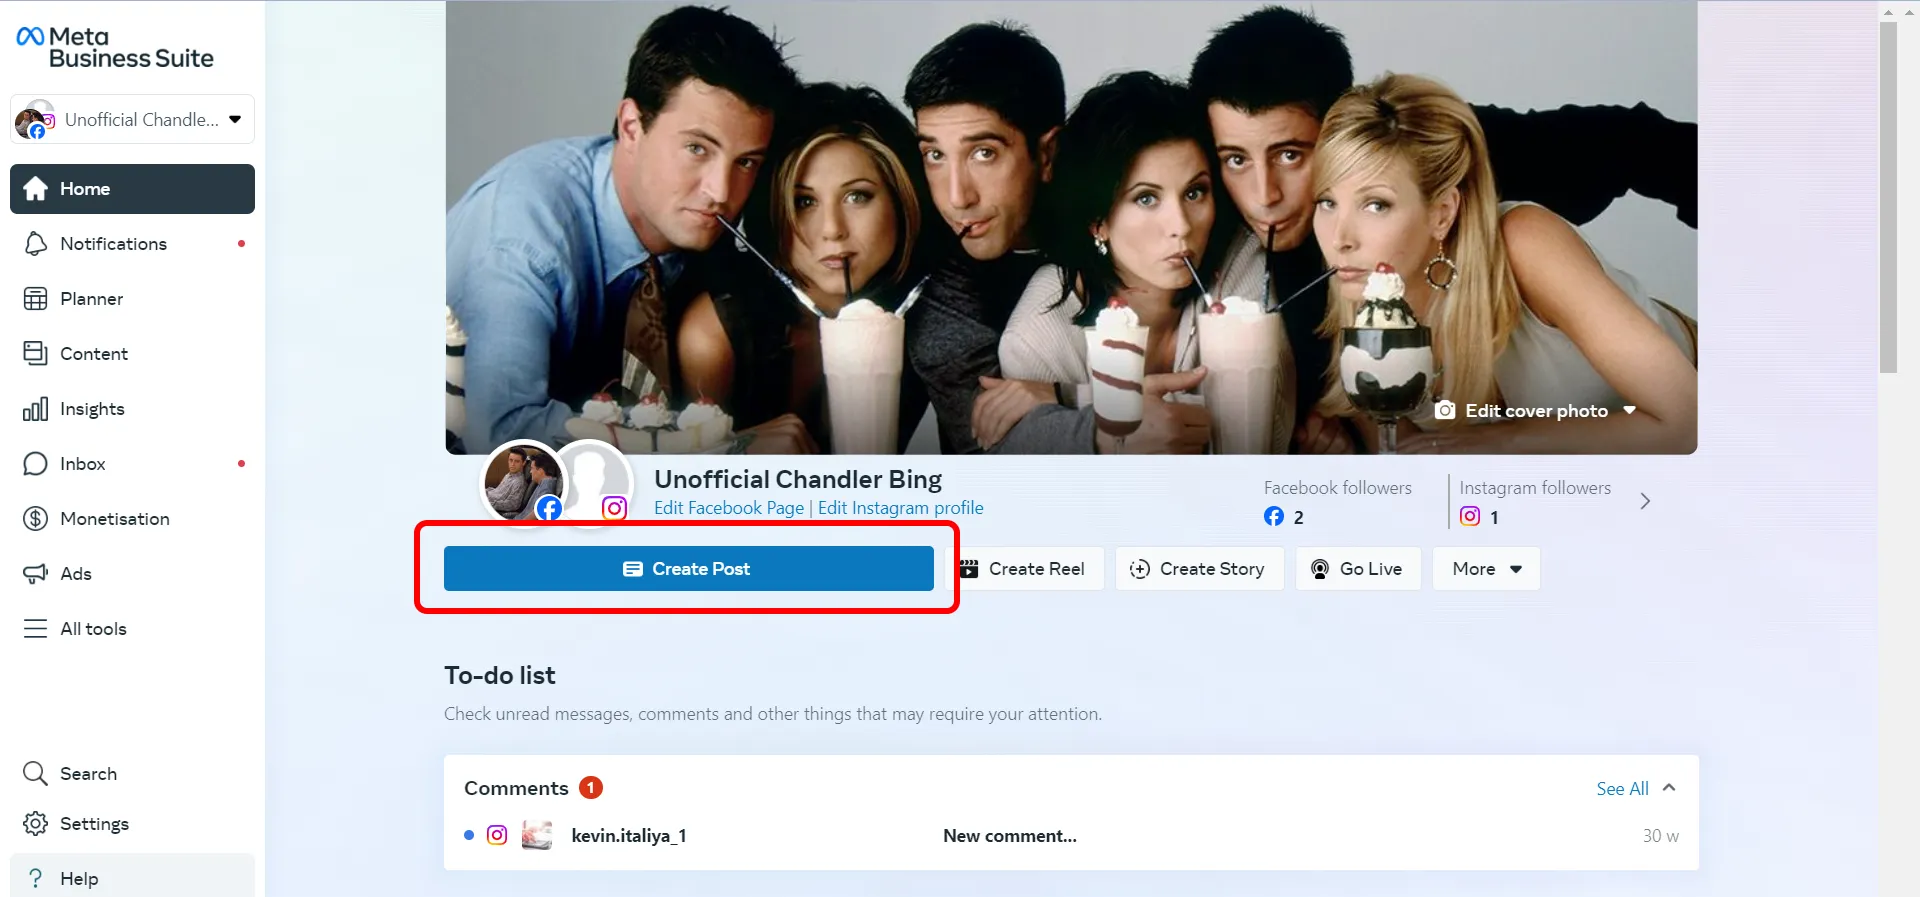
- Go to Meta Business Suite and log in to your Facebook account.
- Click on “Create Post”.
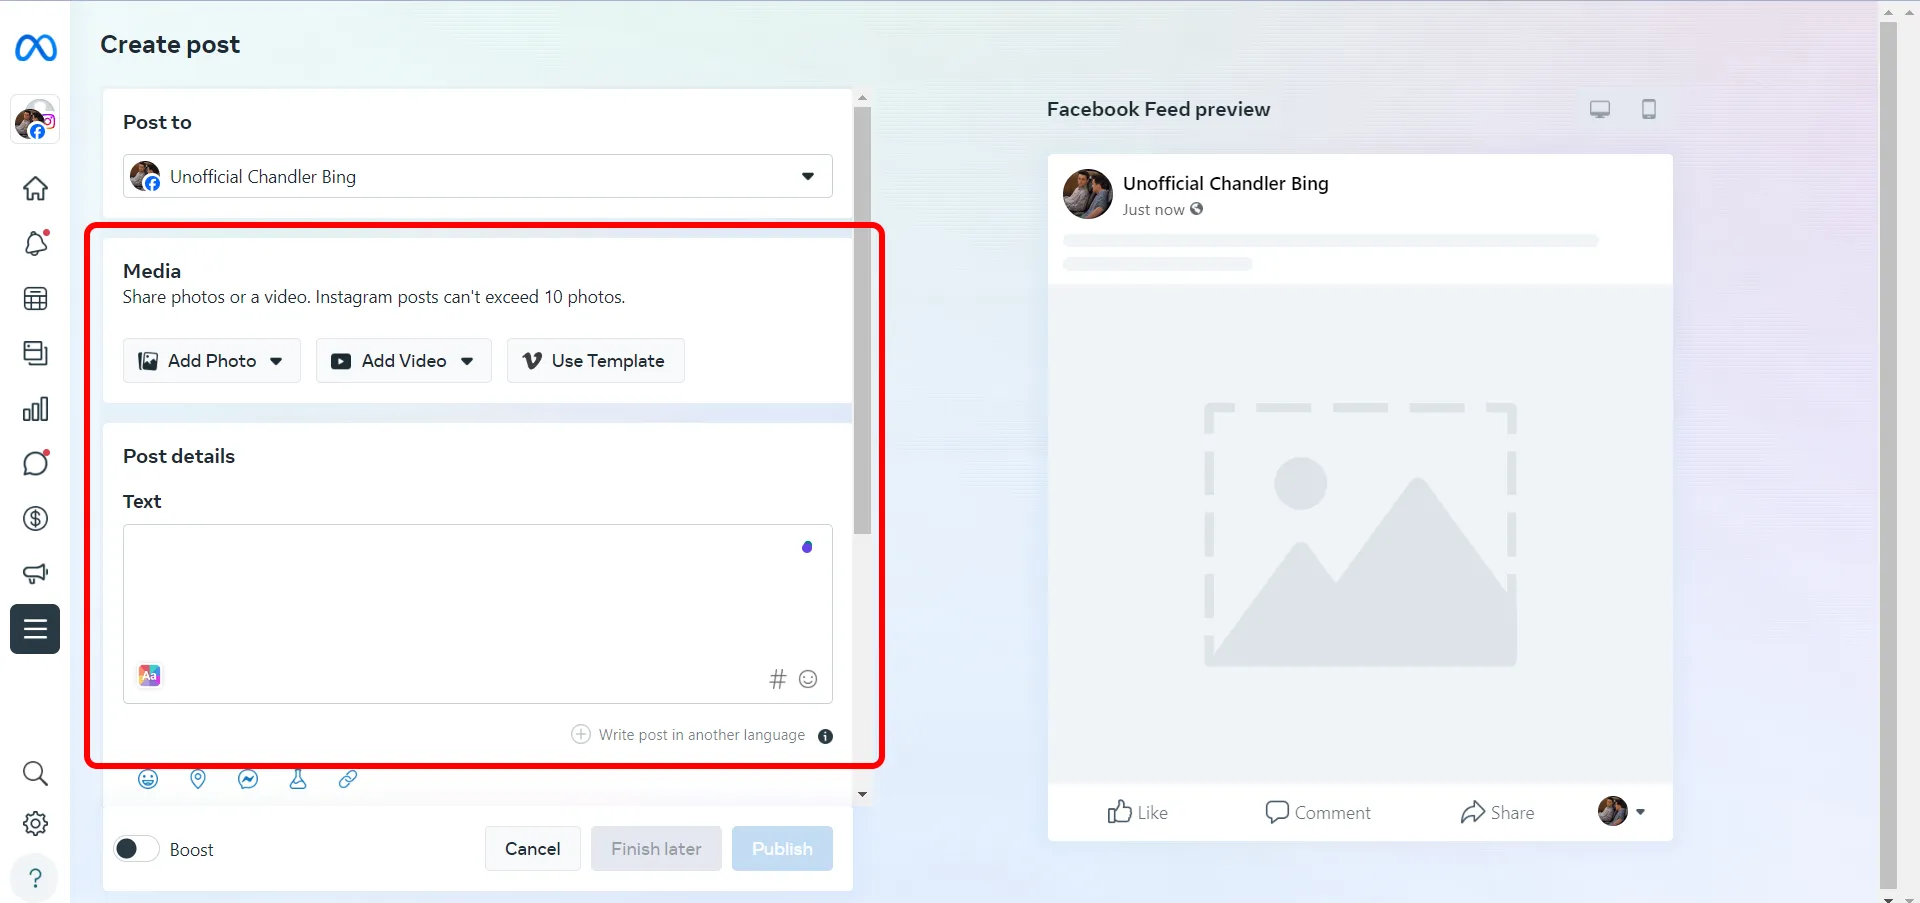
- From the ‘Post to’ box, select ‘Instagram.’
- Upload your media and preview the post on the right-hand side of the screen.
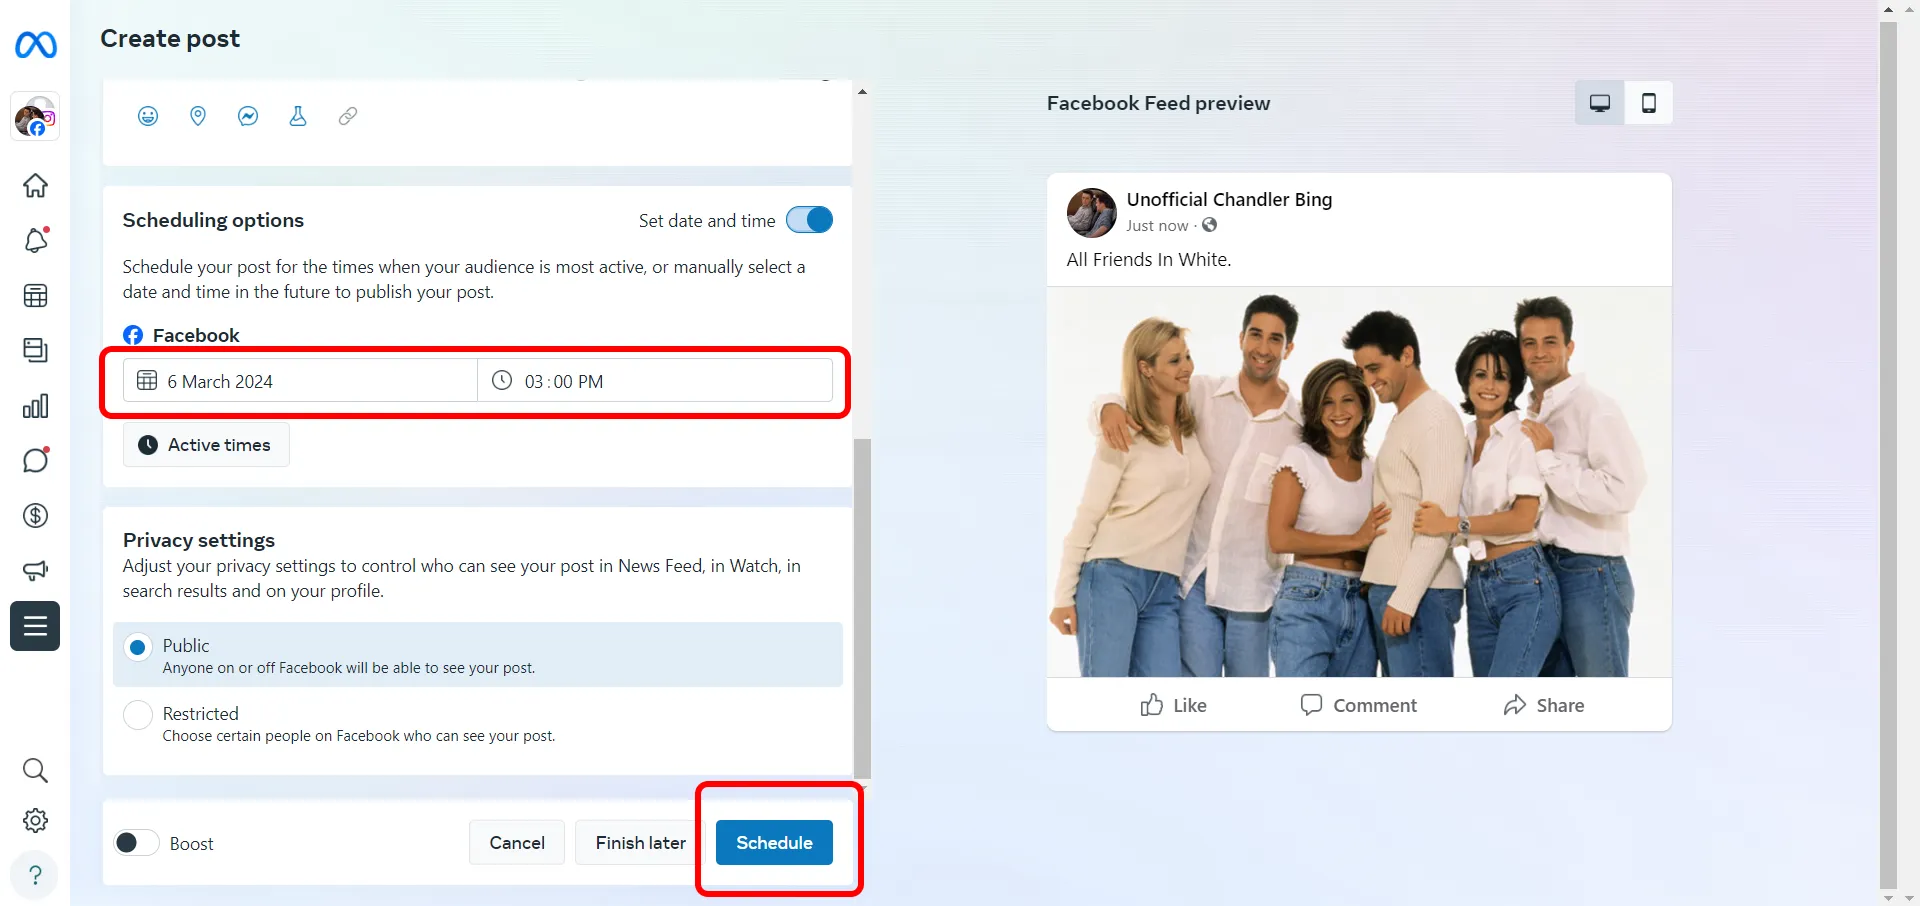
- Scroll down to the scheduling options and Select ‘Schedule.’
- Enter the date and time as per your requirement.
- Click on ‘Schedule’.
Now, you know how to schedule a post on Instagram using Meta Business Suite. However, the Meta Business Suite may not be sufficient if you’re looking for advanced features like collaboration, bulk scheduling, and more.
That’s where third-party tools like SocialPilot come into the picture. SocialPilot’s comprehensive social media management tool offers advanced features to manage and schedule your social media content across multiple platforms, including Instagram.
So, if you’re an individual, brand, or agency handling multiple Instagram accounts, SocialPilot is the perfect tool to streamline your social media management and take your Instagram strategy to the next level.
How to Schedule Instagram Posts Using Scheduling App
When you have a great marketing strategy to execute that requires you to post cross-platform, it is convenient to use a third-party Instagram scheduling tool like SocialPilot.
As one of the best Instagram automation tools, SocialPilot goes a step further in scheduling and allows you to create content drafts by directly uploading files from Google Drive. It also enables hassle-free automated posting with advanced functionalities. You can schedule feed posts, reels, carousel posts, Instagram stories, and Instagram ads using SocialPilot.
Note: To schedule posts on Instagram using any Instagram scheduling tool, you need a business account linked to a Facebook page.
Before we see a step-by-step process of seamlessly scheduling an Instagram post, sign up on SocialPilot and start your free trial (no credit card details required!) and follow the steps with us as we proceed.
Let’s dive in.
Step 1: Connect your Instagram Profile
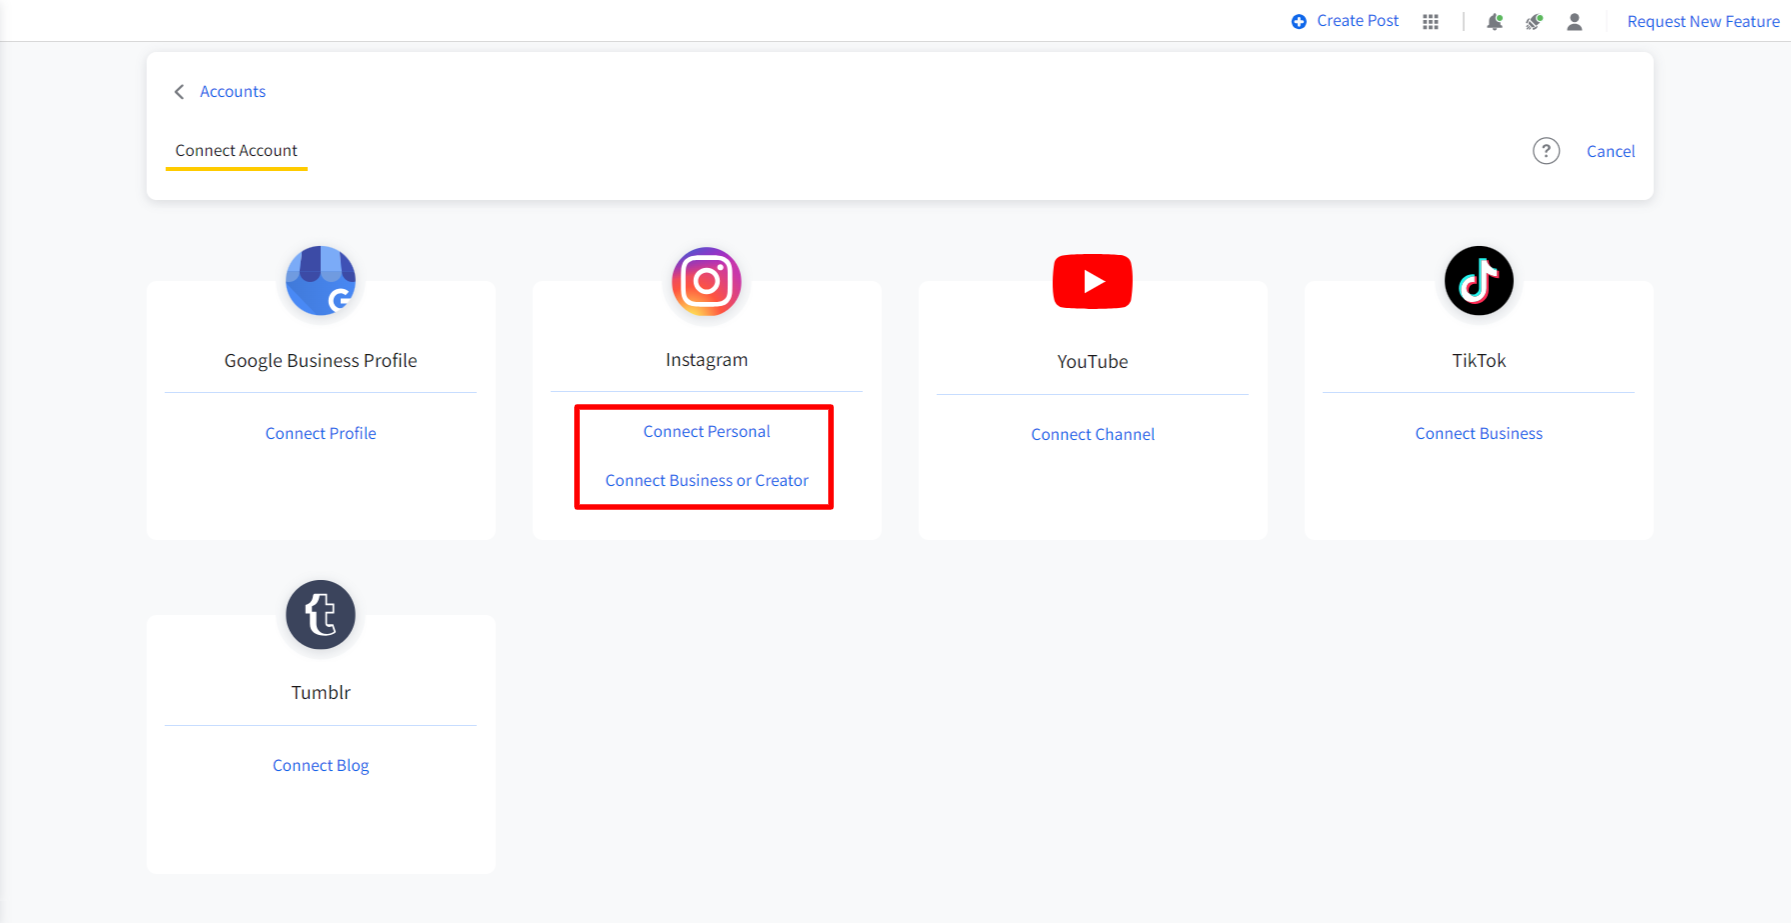
First things first, you need to log in to SocialPilot and connect your Instagram Business account by clicking on “Connect Business.”
Step 2: Create Post
Once the accounts are connected, go to the “Create Post“ option in the SocialPilot sidebar. You can create a draft for all platforms or customize it for a particular platform.
You can also use SocialPilot’s AI Assistant to generate post captions and hashtags at lightning speed. Even if you’re experiencing a creative block, this tool has got you covered. With its Instagram-specific prompt templates and tone preset, you can churn perfect captions in seconds.
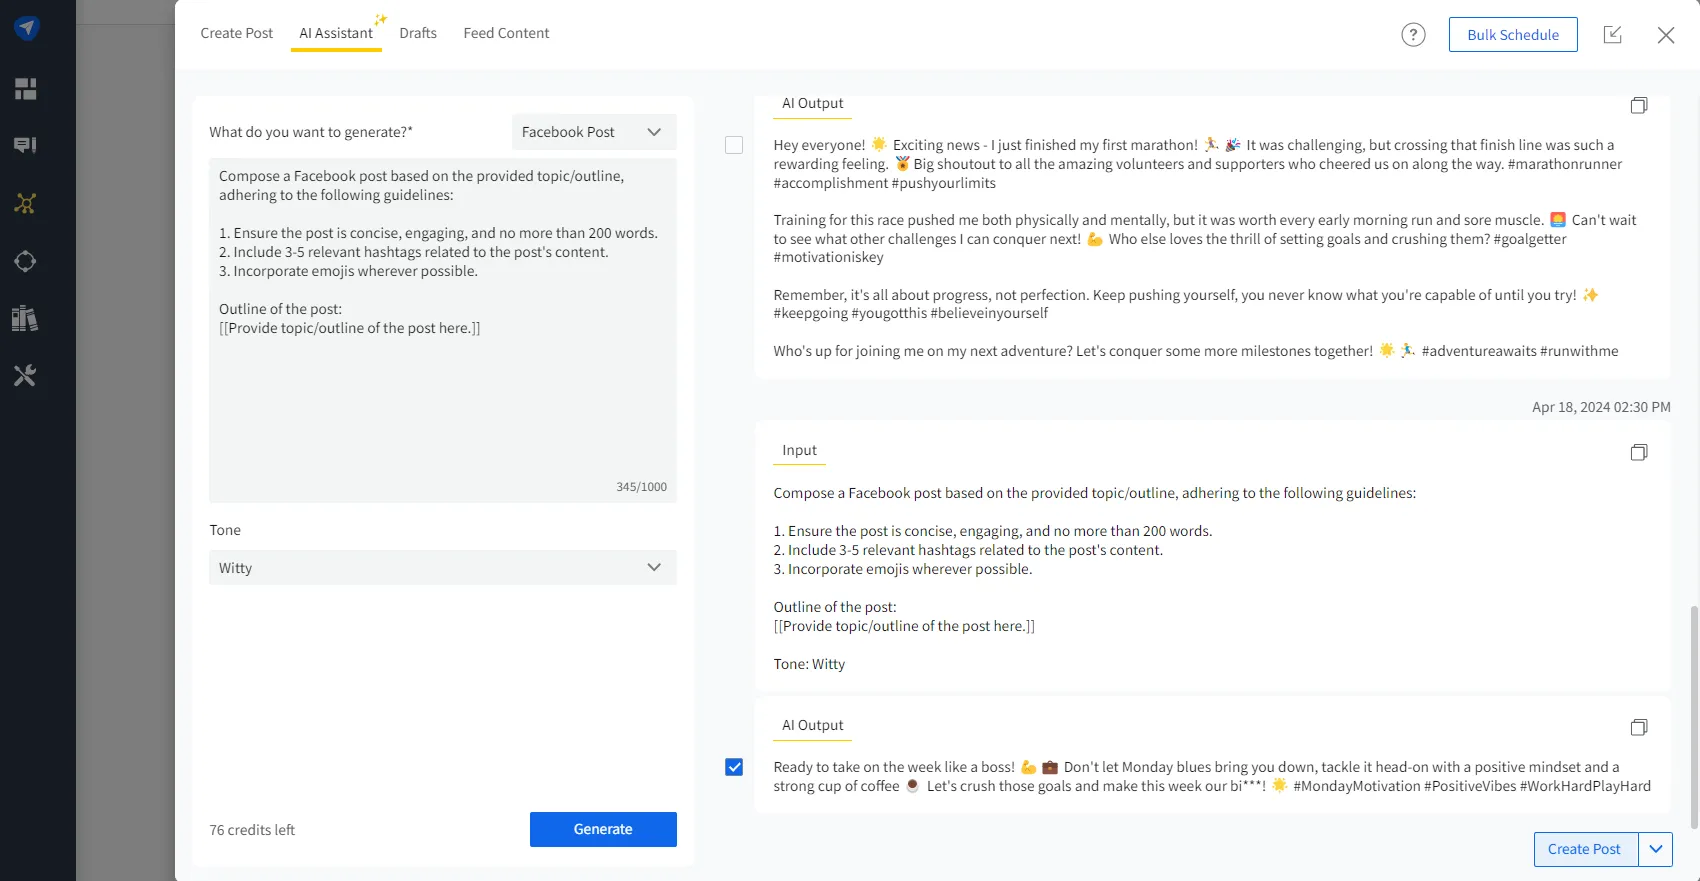
You can also experience the power of AI Assistant right at this moment. Simply hop over to our Instagram caption generator, give it your topic, select a tone, and watch it whip up captivating captions that keep your audience engaged and drive them to take action.
Now, let’s come back to the steps. Since we are scheduling post for Instagram, select the Instagram icon beside the original draft.
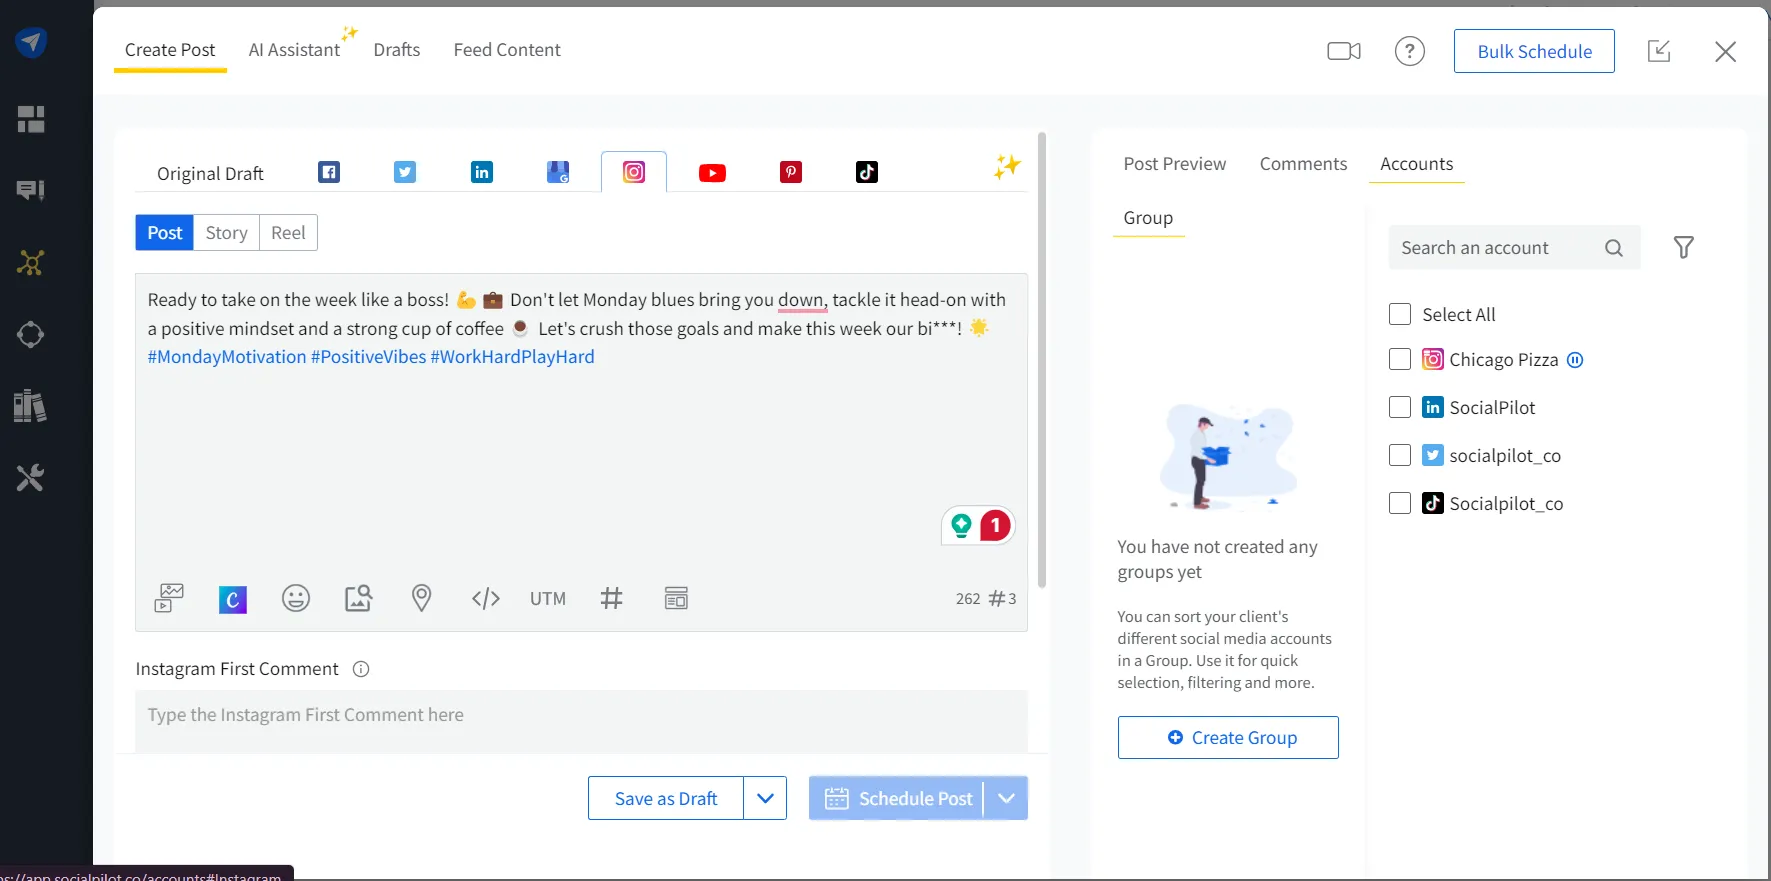
You can customize your post by selecting “Post,” “Story,” or “Reel.” With SocialPilot, you can directly schedule all formats of content directly without any mobile reminders for business Instagram account.
To further enhance your post, you can use advanced features like:
- Image Editing: Use the built-in editor to fine-tune, crop, or apply filters to your images before publishing.
- Creating Social Media posts using Canva: You can also go more creative by using Canva integration and export the designed posts directly to SocialPilot.
- Adding a custom field: You can create account-specific fields to automatically add any preset information (franchise address, legal disclaimer, tagline, hashtags, etc.) to your captions.
- Instagram post first comment: Keep your image caption clean and clear by putting your hashtags in your first comment.
- Location Tagging: To expand your reach further, you can tag a target location for your post.
Step 3: Select Account and Scheduling Post
After customizing your post, it’s time to select the Instagram account.
On the right-hand side, you can see the list of accounts. Select the Instagram accounts where you want to publish your post.
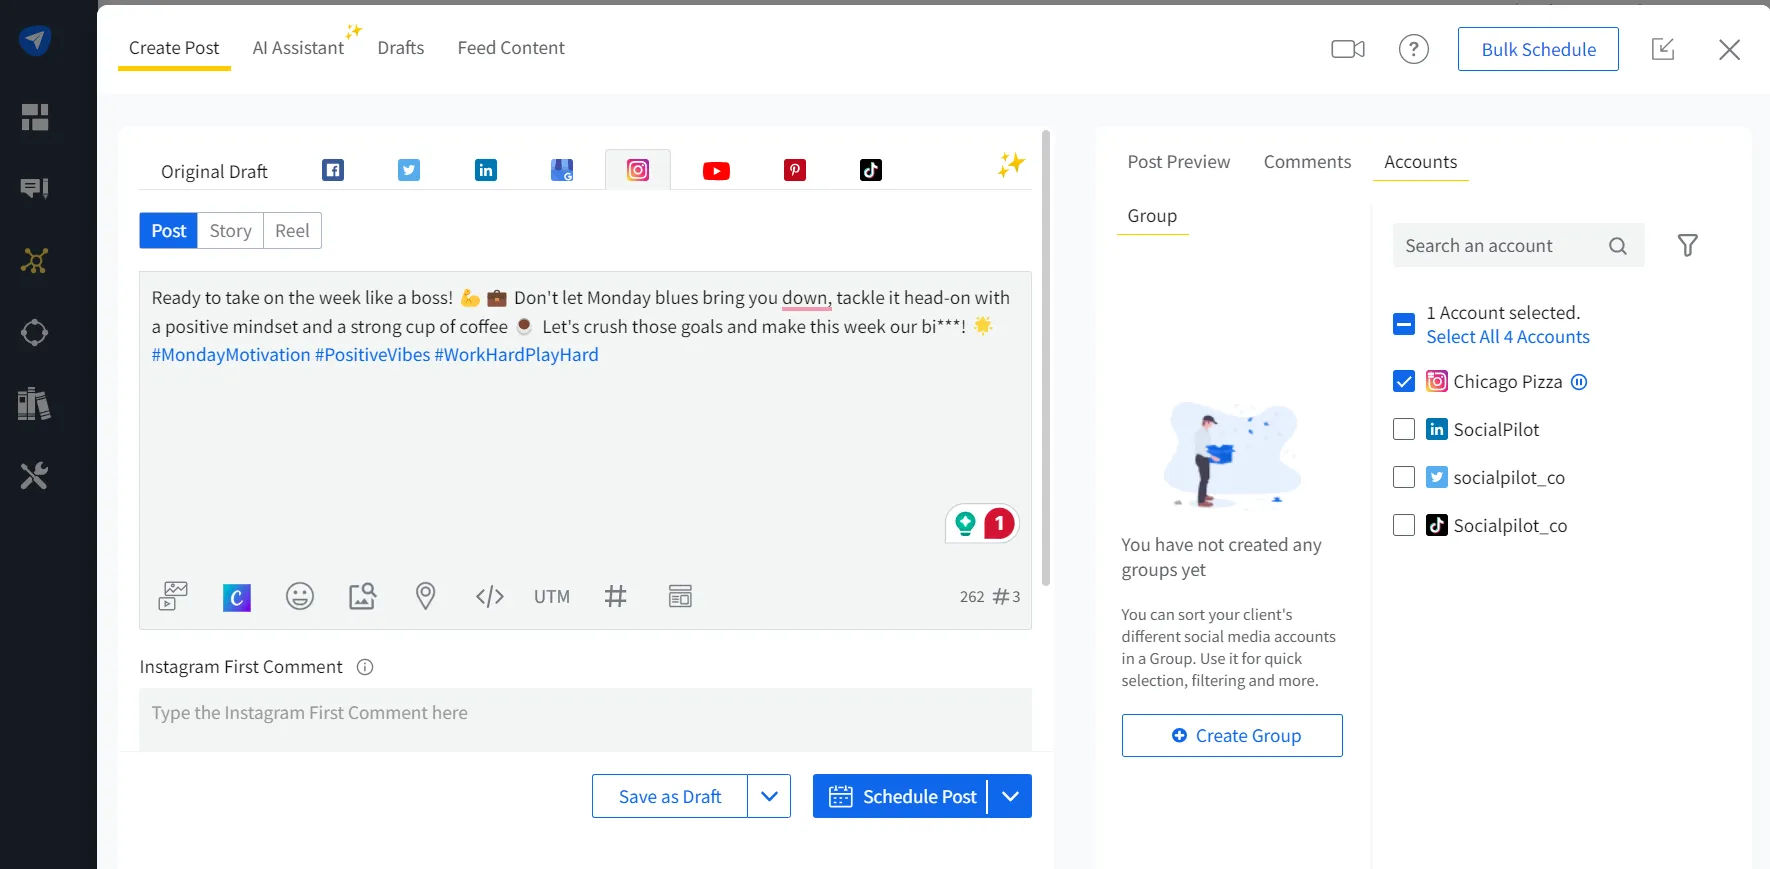
As a marketer, you must manage multiple social media accounts for the same clients.
Your post is created, and the accounts are selected; now, all that is left is to schedule this post.
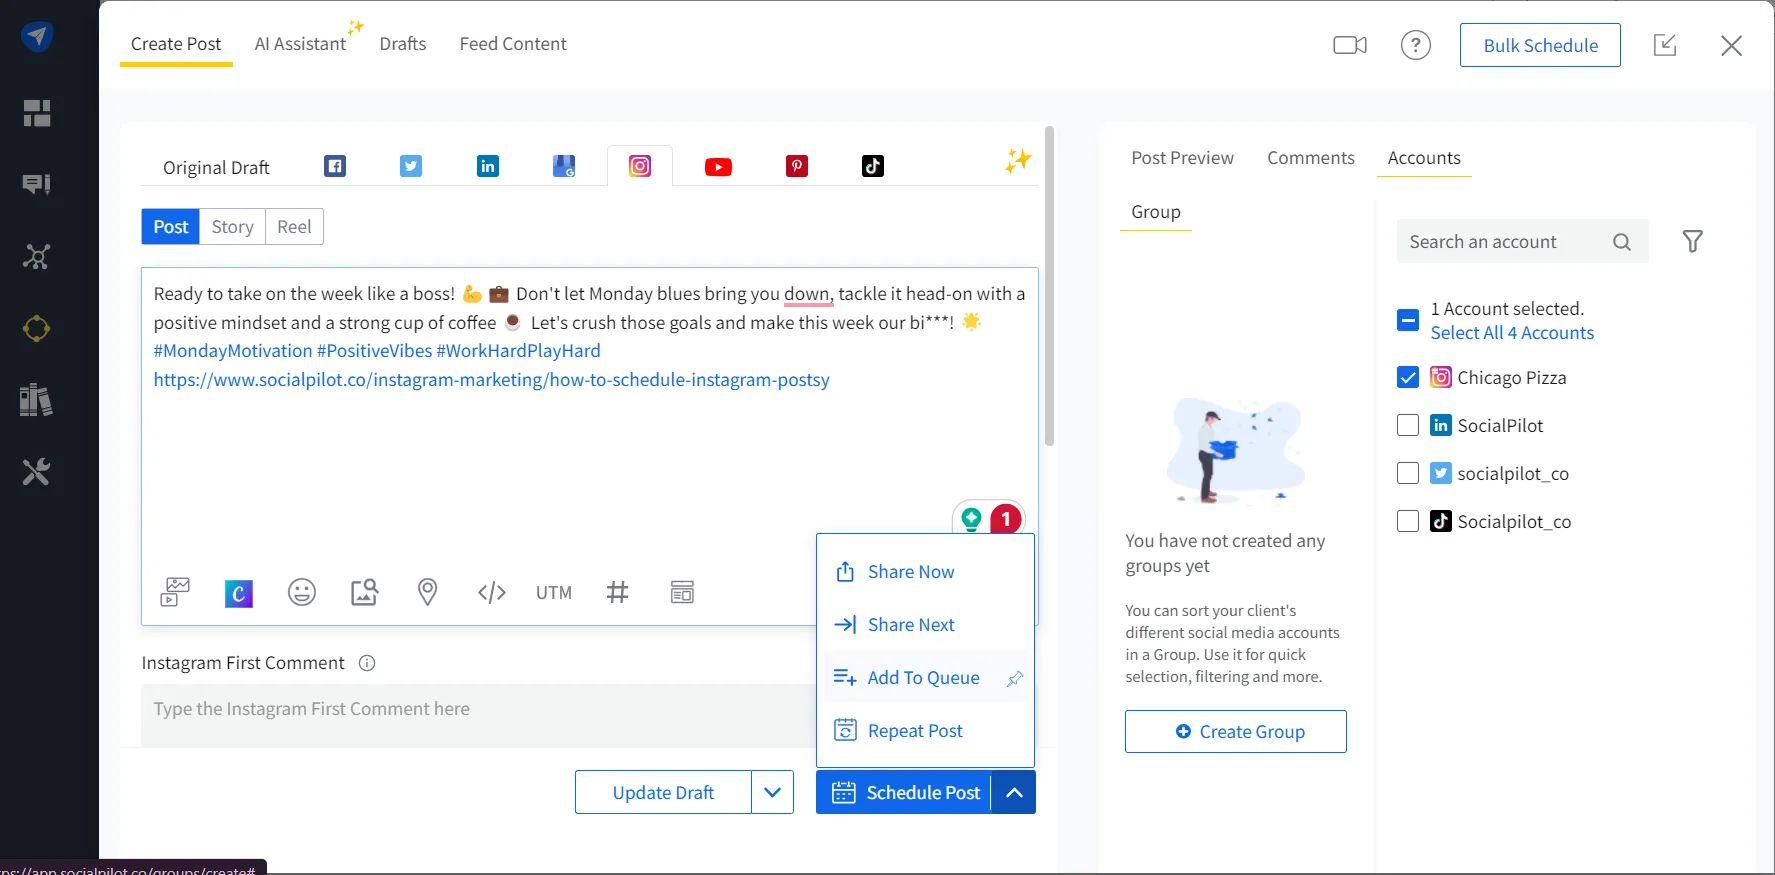
Enter the date and time when you want your post to go live, and click “Schedule.”
And that’s not all,
You can also schedule social media post for your personal profile by linking it to SocialPilot. You’ll receive a push notification on your phone via the SocialPilot app for your posts exactly when you have scheduled them for.
How to Schedule Instagram Posts in Bulk [Upto 500 Posts]
As a social media marketer, you have to deal with multiple things like events, campaigns, product launches, etc. Naturally, you’d have already planned a month’s posts in a spreadsheet to be published. In that case, scheduling posts individually would be a hassle.
Lucky for y’all, using SocialPilot’s bulk schedule feature lets you schedule up to 500 Instagram posts simultaneously.
Let’s break down the process of scheduling multiple Instagram posts at once with bulk scheduling using SocialPilot.
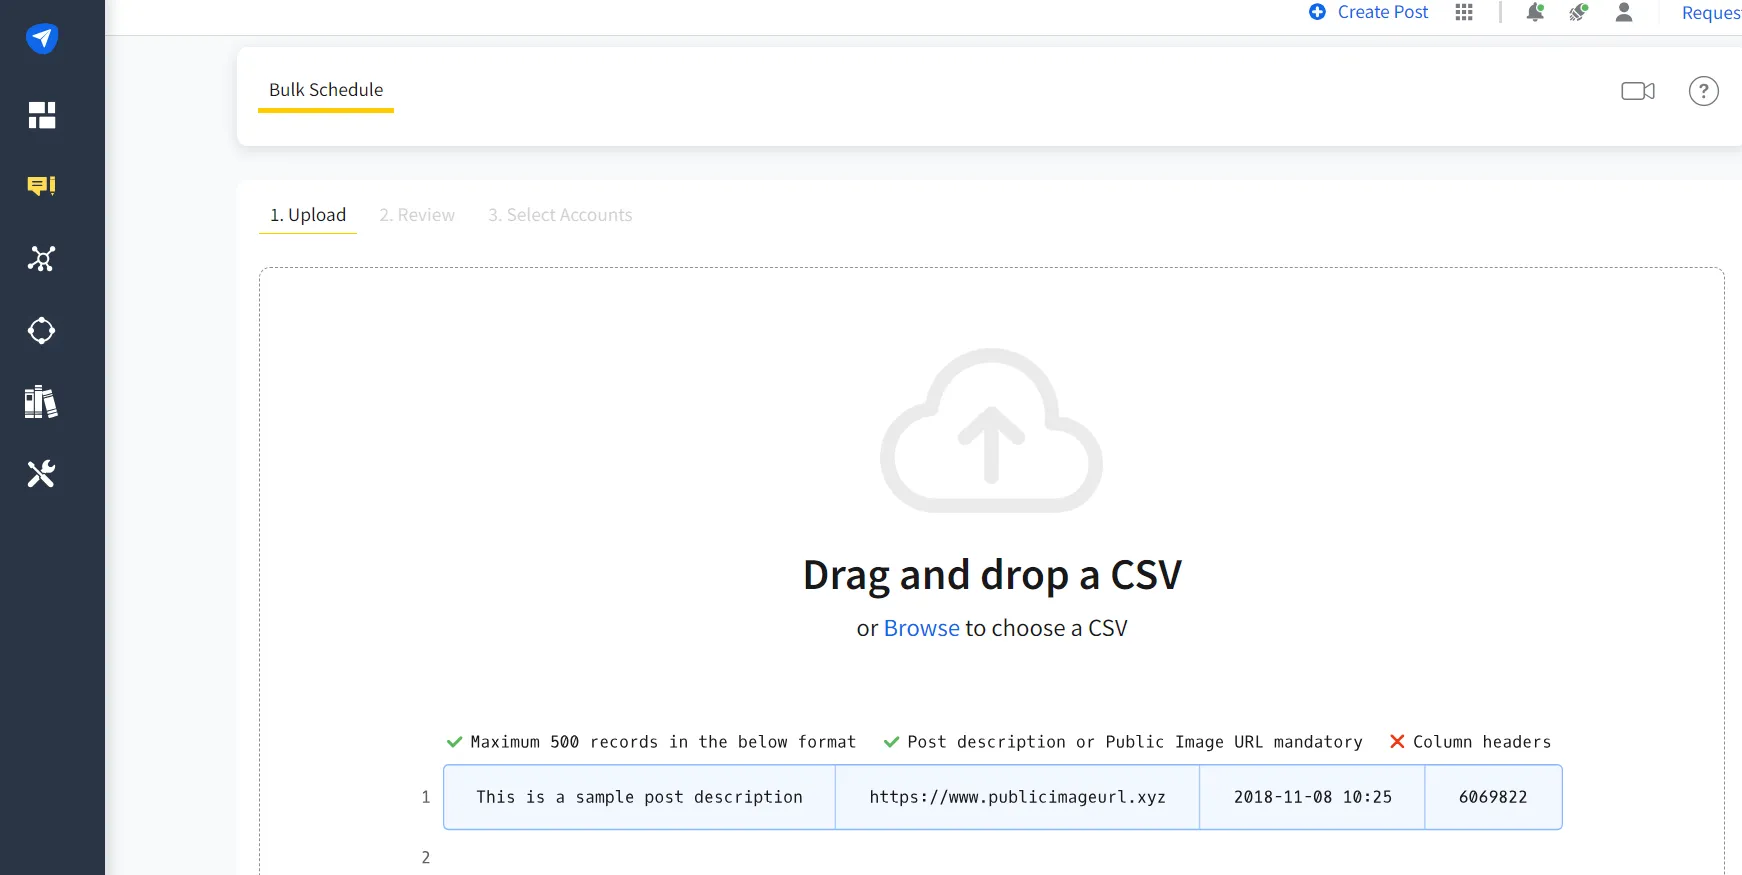
Step 1: Upload your CSV file
Bulk scheduling is as easy as drag-dropping your CSV file.
Step 2: Review your Posts
Before publishing, it’s better to check again at the last minute for any errors in the posts.
Thereby, after uploading your CSV file, you’re directed to the preview page.
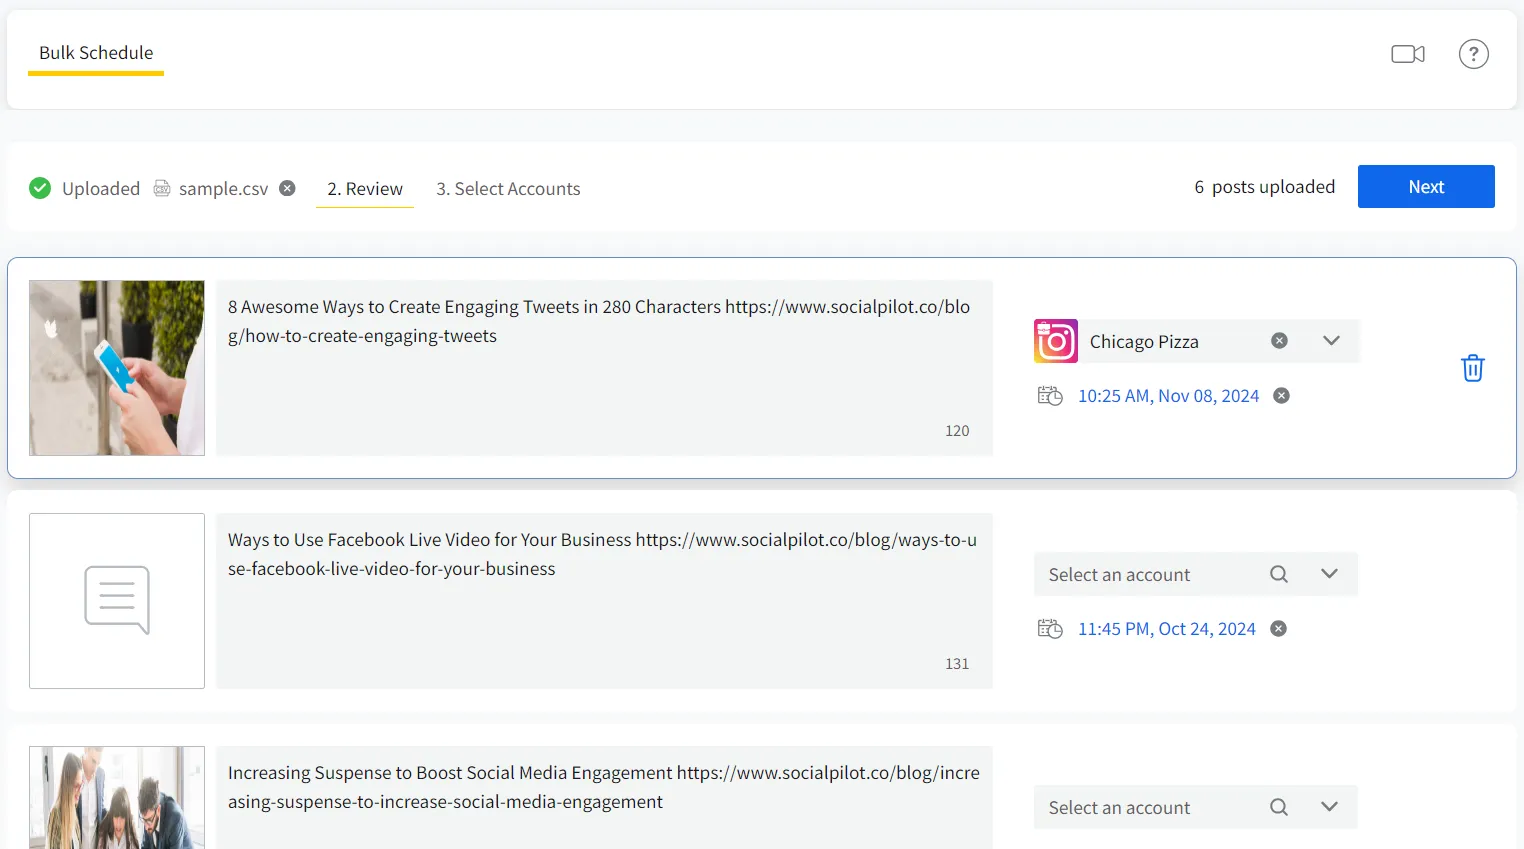
You can review all of the posts alongside their images and text content. You can make any required changes here.
Now, click the “Select Account“ button on the top right.
Step 3: One Click to Do the Trick
One final step, click “Schedule Posts.”
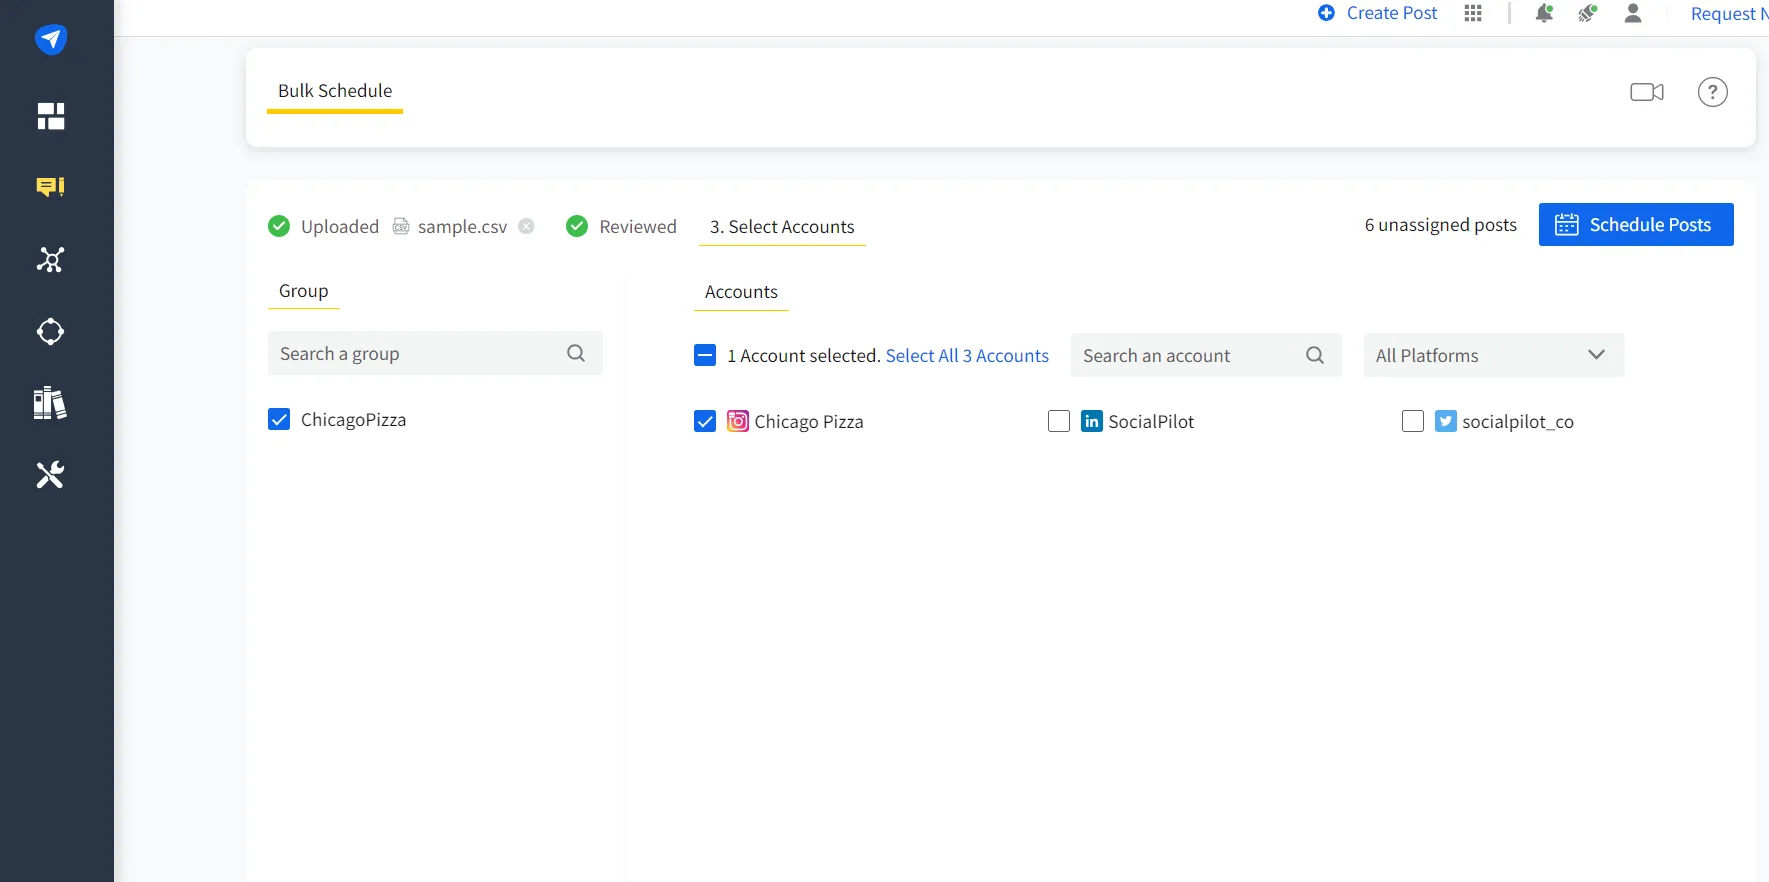
Your posts are all scheduled and ready to be published once their time comes.
By scheduling Instagram post with SocialPilot in advance, you will:
- Save time by automating the tedious process of manual posting.
- Utilize that extra time by having brainstorming sessions to create campaign strategies.
- Be able to make high-quality posts that resonate with the audience.
- Come up with solid captions that perfectly match your content in a snap with AI assistant.
- Have time to think of solid captions that perfectly match your content.
- Interact with your audience in the extra time to form a connection with them.
As a result, almost all of the pro-marketers schedule Instagram post using third-party tools like SocialPilot.
Instagram Caption Generator
Generate snappy, scroll-halting Instagram captions without pause.
Here is the Generated Result

Create More for Free!
Get 500 Credits to Generate AI Content!
Since you’re an AI fanatic, we are offering you 500 Free Credits to generate awesome content on the AI Assistant of SocialPilot.
Now, let’s come back to the steps. Since we are scheduling posts for Instagram, select the Instagram icon beside the original draft.
Scheduling Instagram Post on Mobile
Next let us discuss, how you can schedule your Instagram post through your mobile device. You can do so with the help of Instagram’s native platform or seamlessly with the SocialPilot app.
You can post through the native app using the above steps. But since the native application has limited features, you can use the SocialPilot mobile application to schedule your post. Here are the steps:
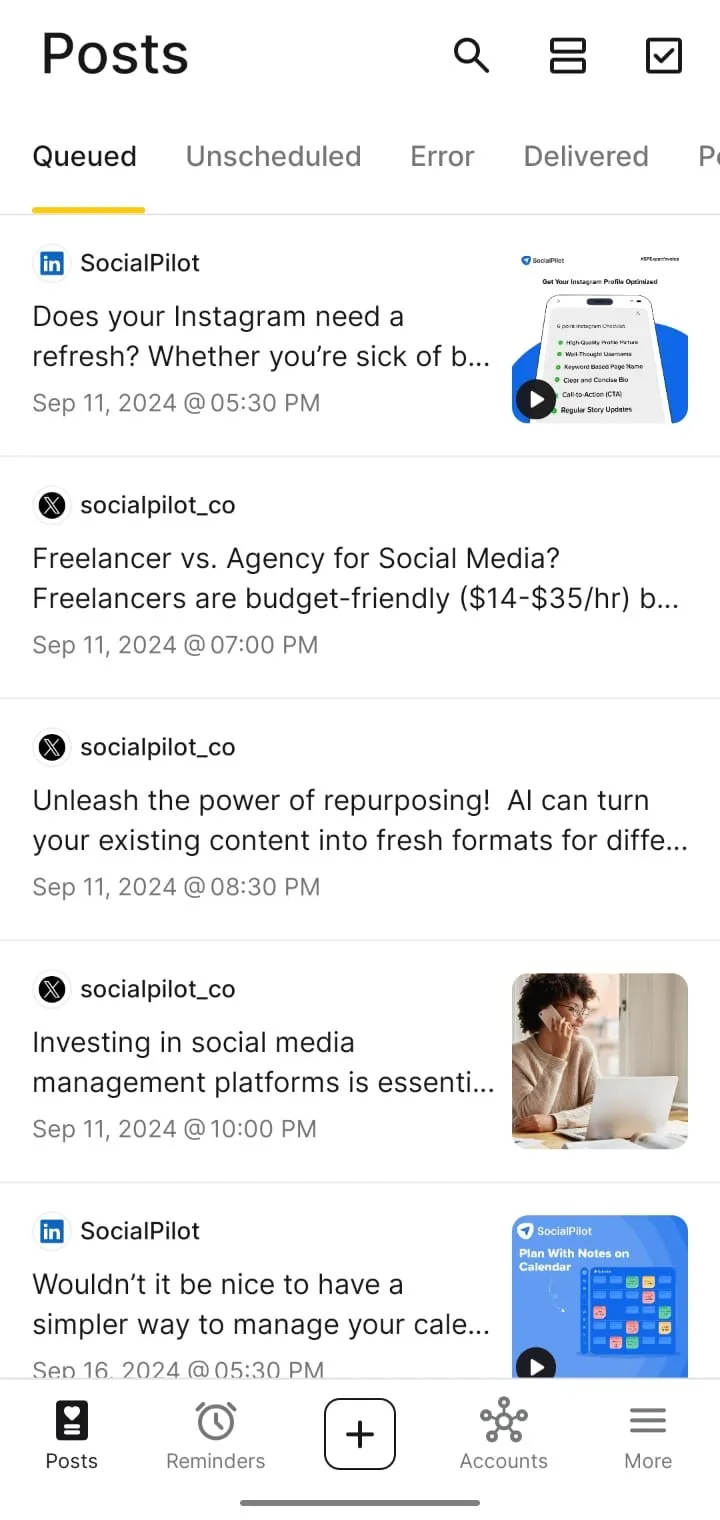
Step 1: Log In to Your SocialPilot Account
After downloading the SocialPilot mobile application, log in and click “+” at the bottom of the screen to start creating the reels.
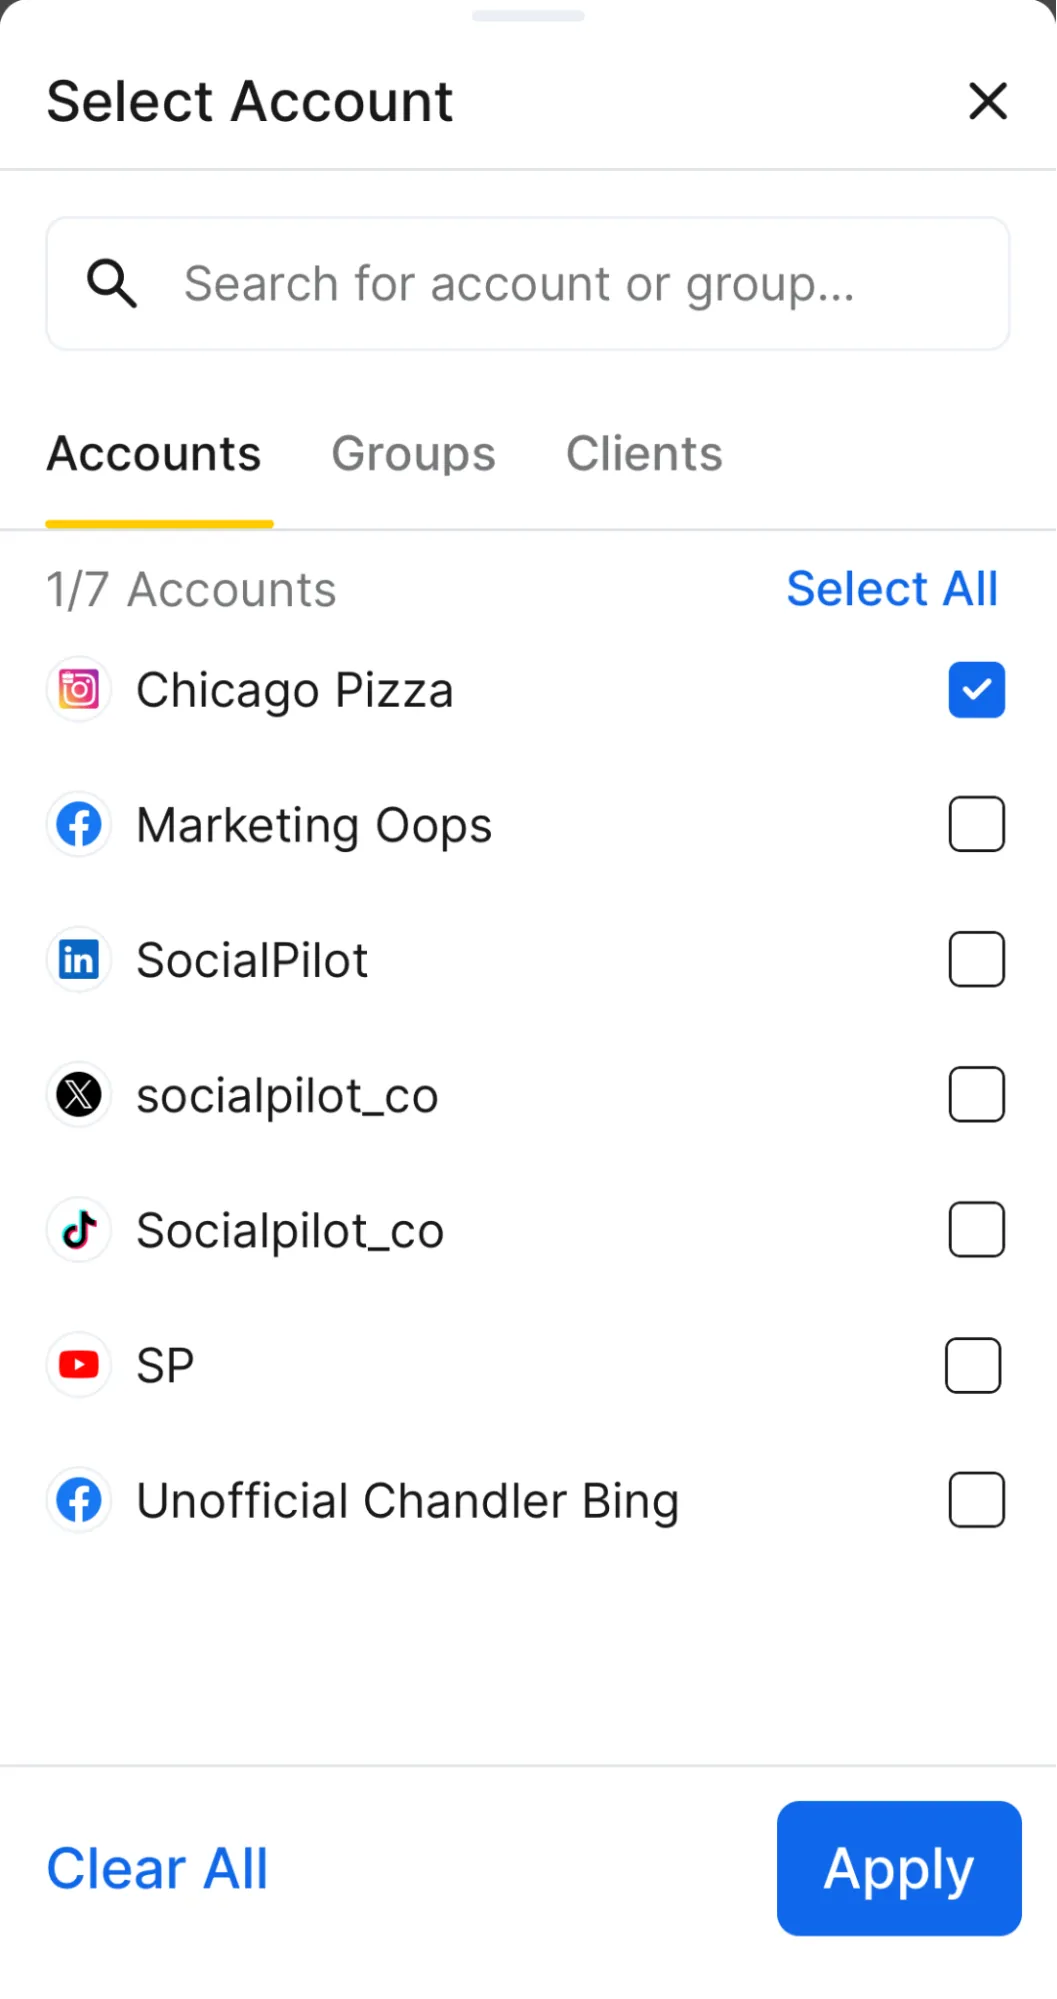
Step 2: Create the Post and Select Your Instagram Account
You can get your post ready by uploading the video or the image and adding a description along with relevant hashtags.
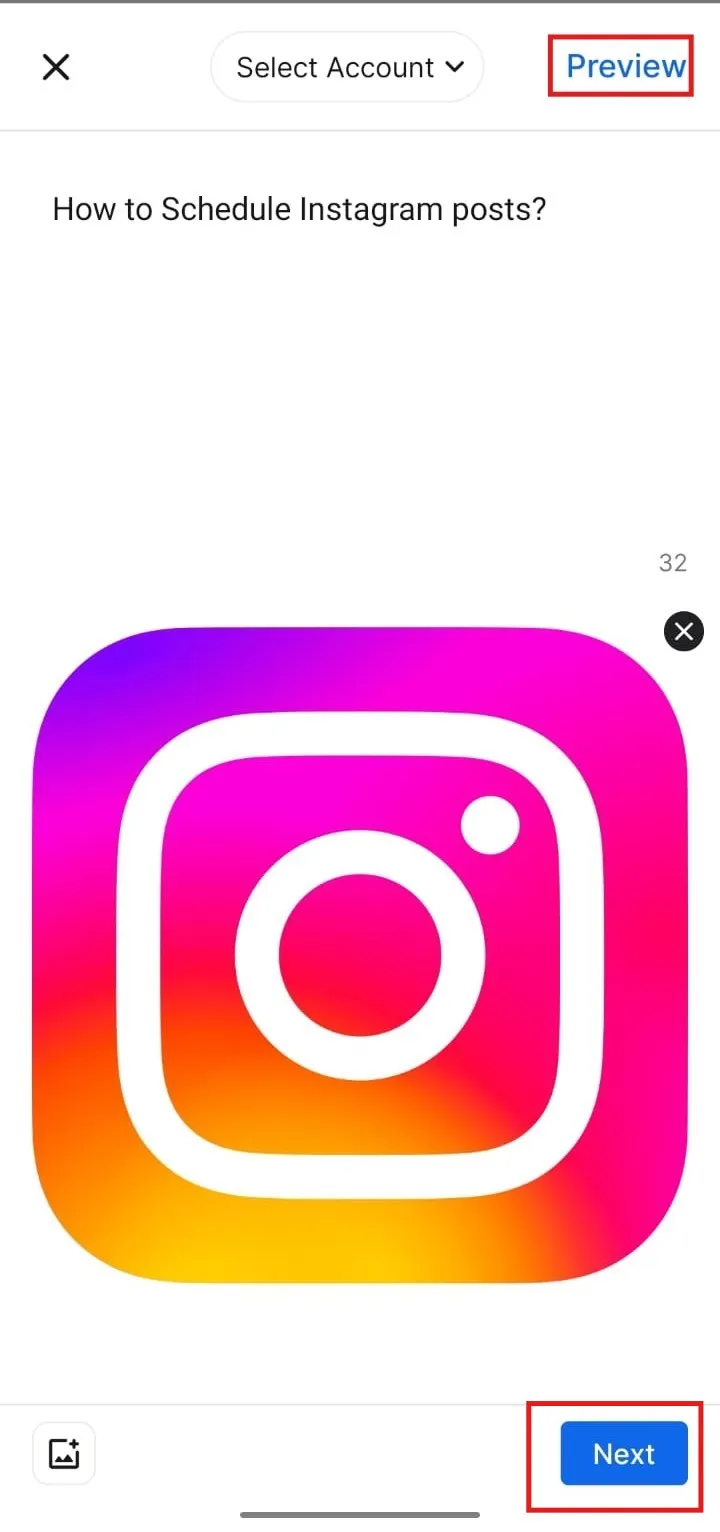
Step 3: Preview the Post and Pick the Scheduling Option
After composing the post, you can check for possible errors by the “Previewing the Post” option in the app at the top right corner, and then just pick your scheduling option by clicking on the “Next” button at the button.
And done. Your posts will go live at the time you set.
How to Find and Edit Scheduled Post on Instagram
What if after scheduling, you need to edit your Instagram post. Knowing how you can find and edit your post is equality necessary.
Here’s how you can edit your scheduled posts:
Edit Posts on Your Instagram App
If you have scheduled your posts using the Instagram native application, follow the below steps.
- Step 1: Open your Instagram profile.
- Step 2: Tap the menu icon in the top right corner and select “Scheduled content.”
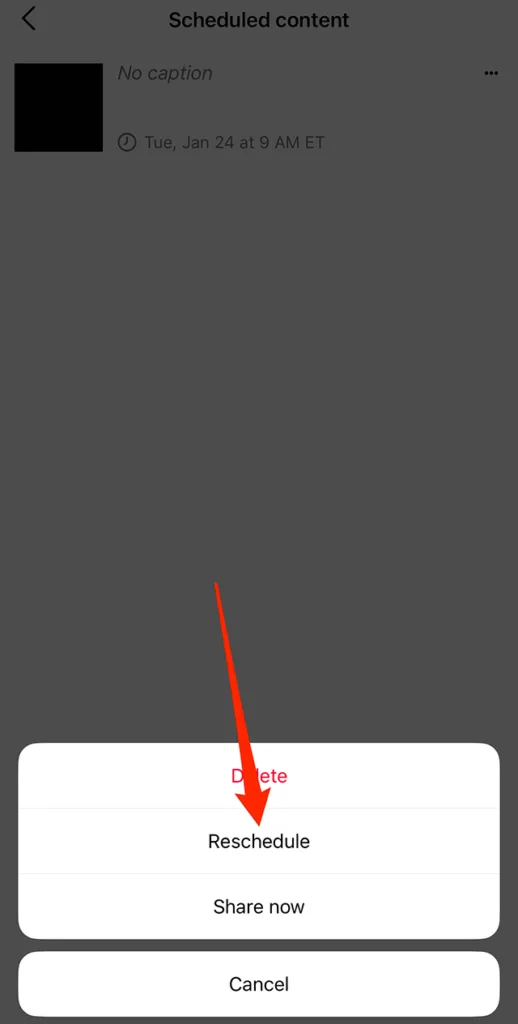
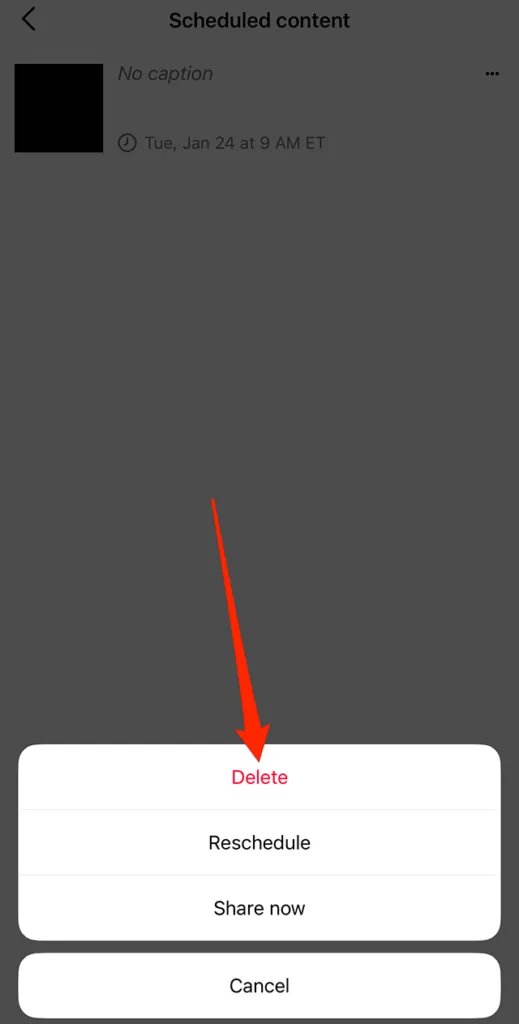
- Step 3: Find the post or Reel you want to modify and tap the options icon next to it.
- Step 4: Choose to reschedule, share now, or delete the content.
Edit Posts on through Meta Business Suite
If you have scheduled your post with Meta Business Suite, you can also edit and reschedule it on the same platform. Checkout the steps to see how to edit a scheduled Instagram post through Meta Business Suite:
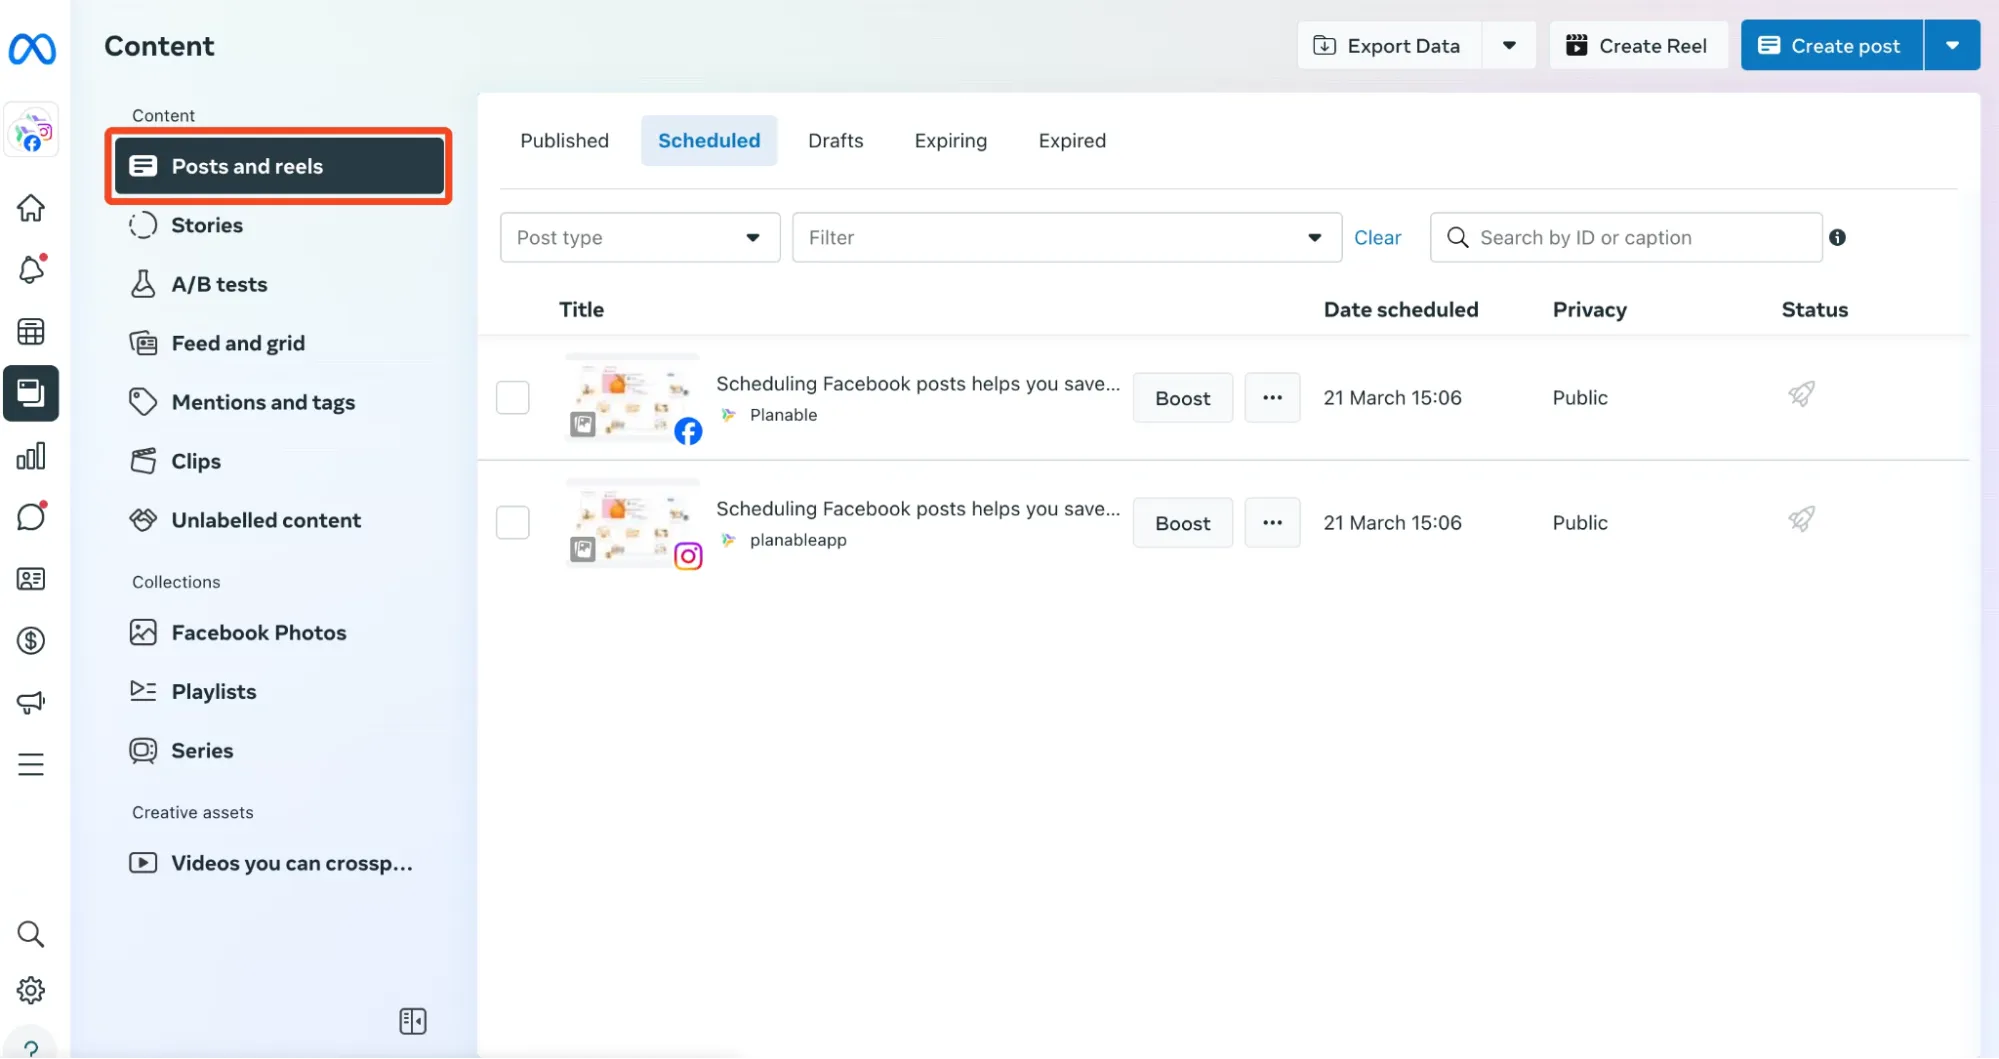
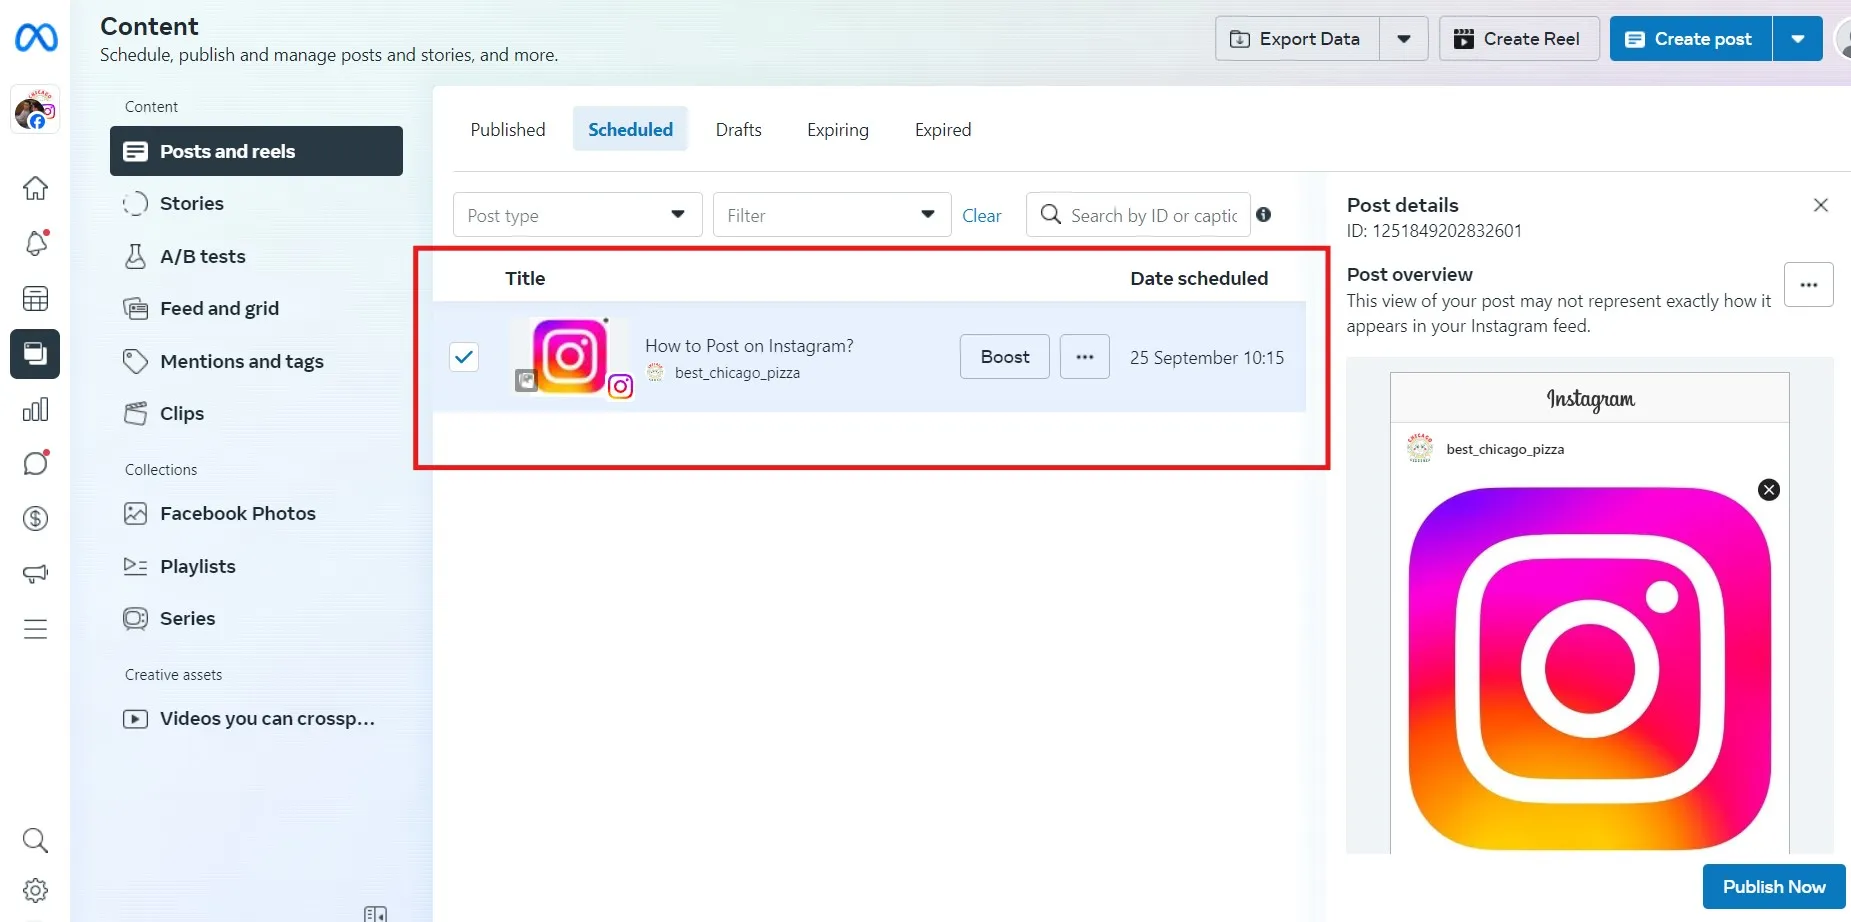
- Step 1: Navigate to Meta Business Suite, then go to Content > Posts & Reels > Scheduled.
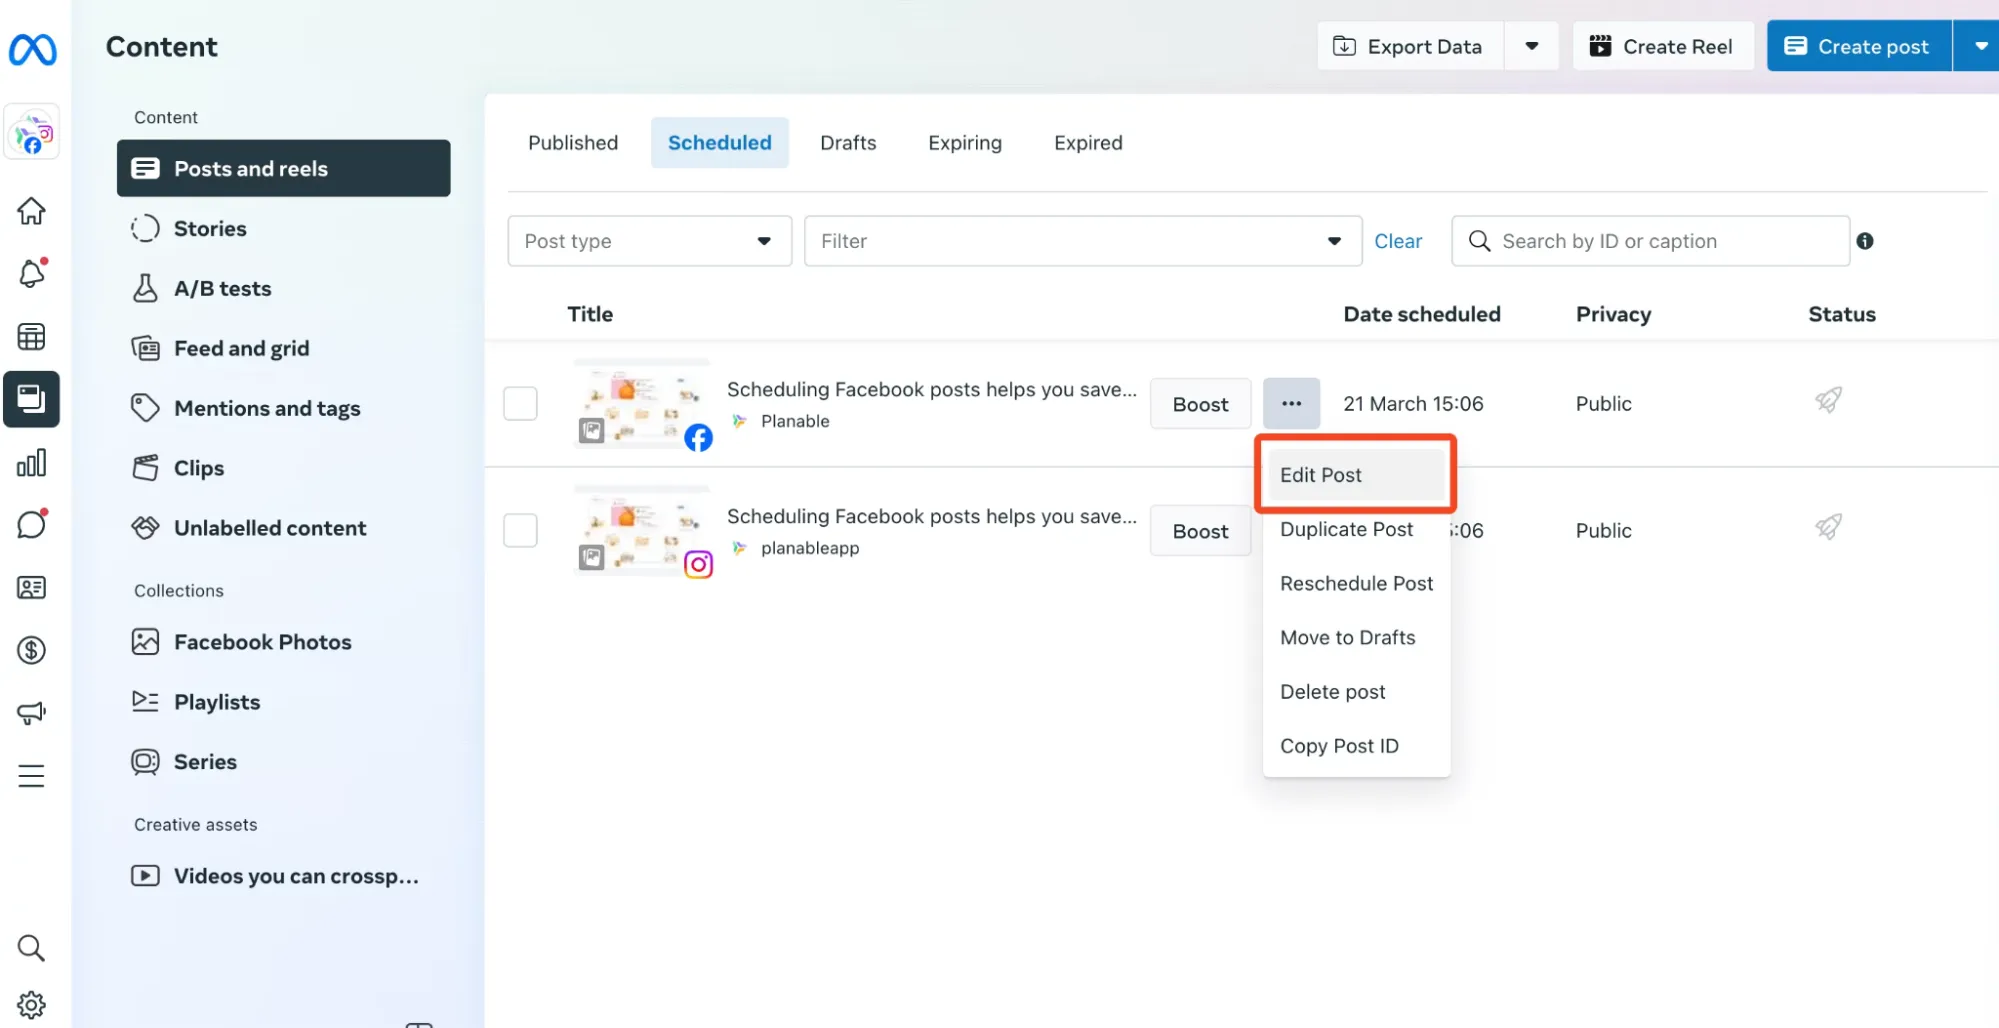
- Step 2: Locate the post you wish to reschedule, and click the three dots icon.
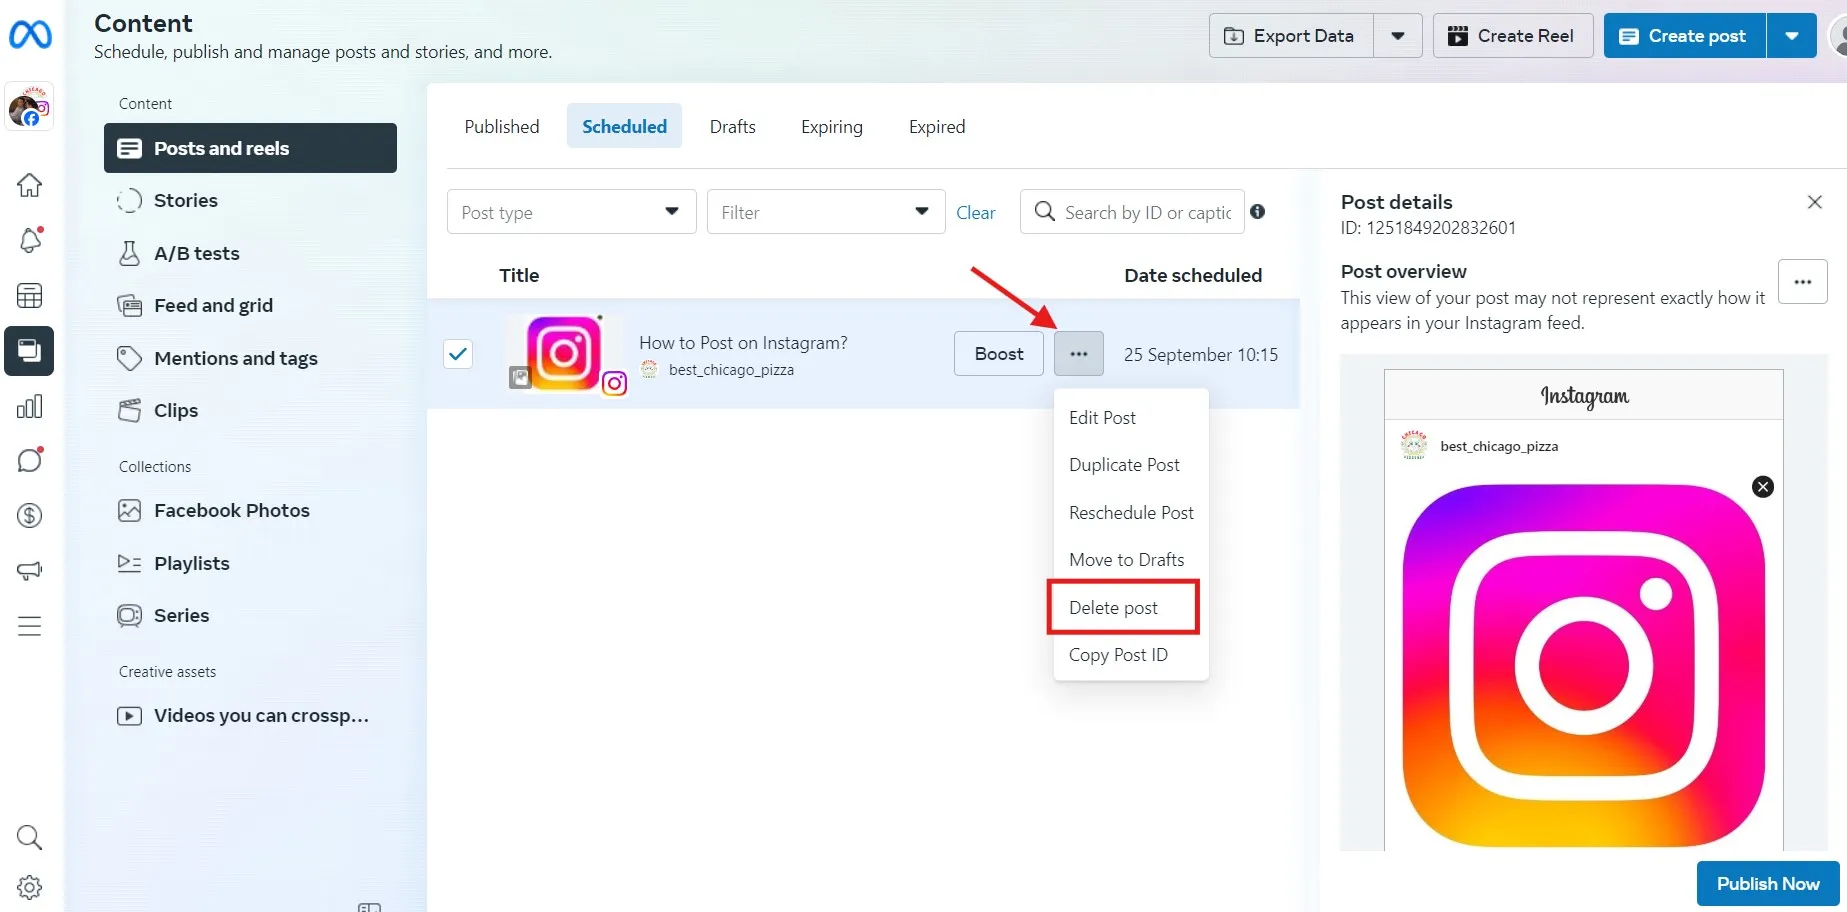
- Step 3: Select Reschedule Post or Edit Post from the dropdown menu.
- Step 4: Choose a new date and time for your post, and click Reschedule to confirm.
Edit Posts with SocialPilot
Not just scheduling you can even edit your Instagram post easily using any social media scheduling tool such as SocialPilot.
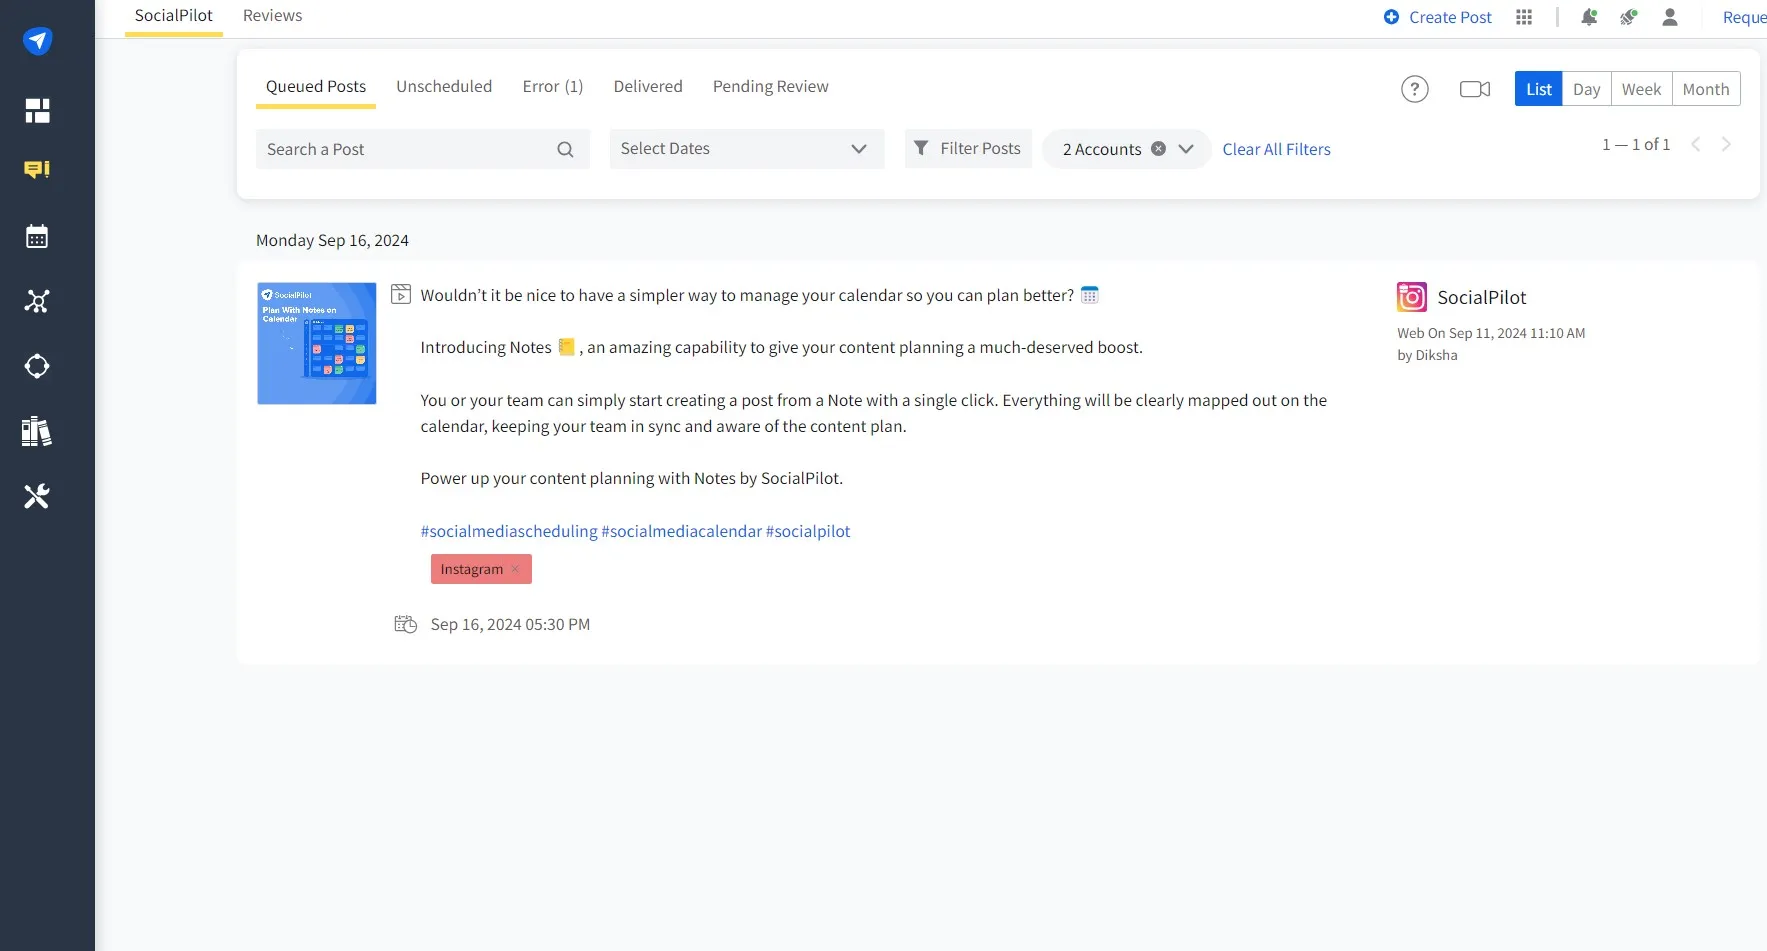
- Step 1: Open SocialPilot and locate the queued posts, which will include your scheduled Instagram post.
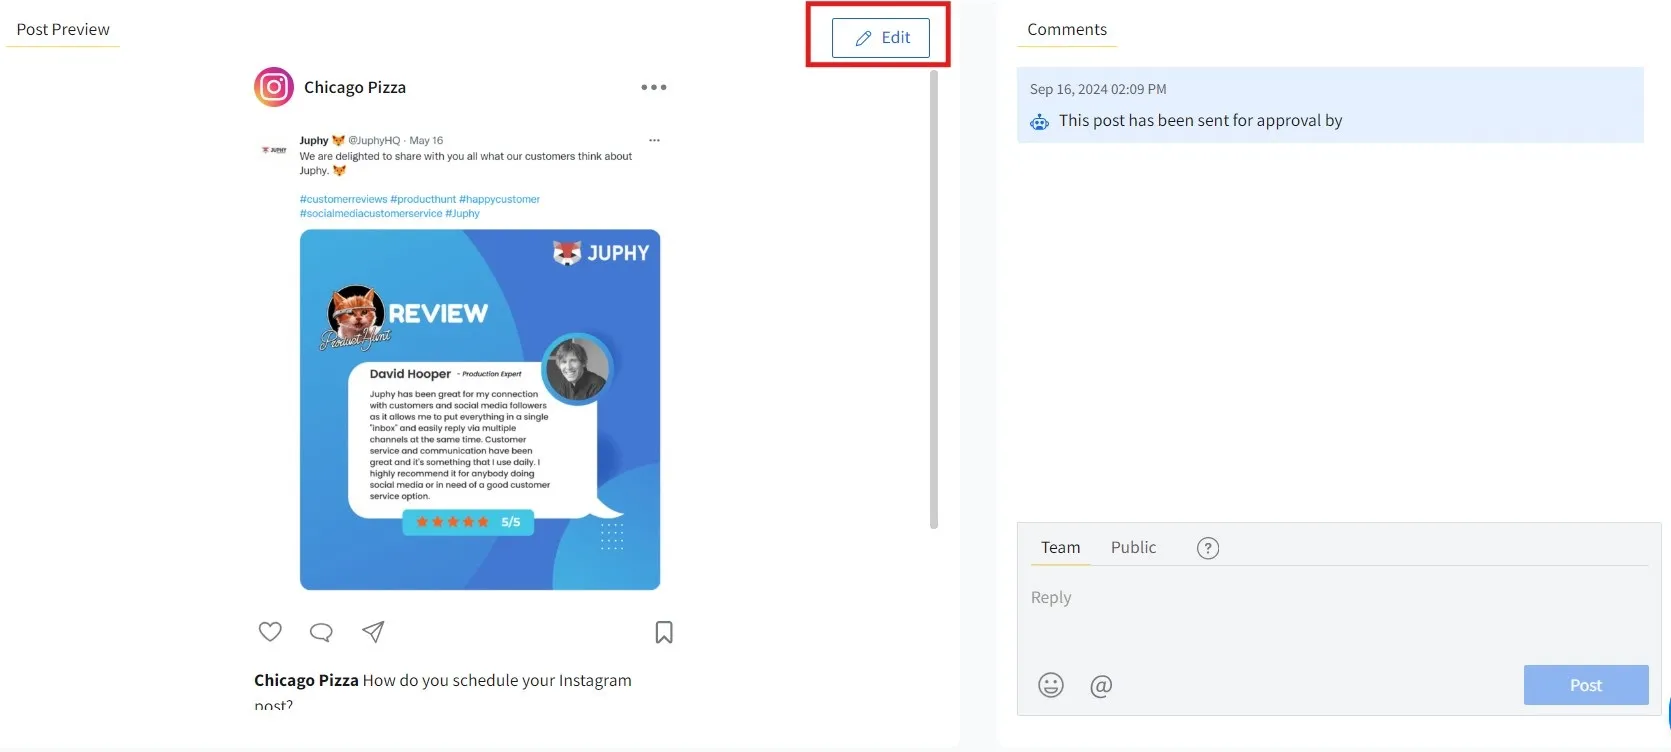
- Step 2: Click on the post you want to edit, then click the edit button displayed over it.
- Step 3: A pop-up will appear, allowing you to edit and reschedule the post.
- Step 4: Click the reschedule button to adjust the time and date for when you want the post to go live.
Edit Instagram Posts with Mobile
You can also reschedule your Instagram post with the SocialPilot app. Follow these steps to reschedule your posts on mobile.
- Step 1: Log in to your SocialPilot dashboard and go to the queued posts section, which will include your scheduled Instagram posts.
- Step 2: Find and click on the Instagram posts you want to edit. Then click on the three-dot icon displayed over them.
- Step 3: A pop-up will appear, allowing you to edit and reschedule the post.
- Step 4: Click the Reschedule button to select a new time and date for when you want the post to go live.
How to Delete Scheduled Instagram Post
What if, after scheduling an Instagram post, you realize that you do not need it? You may want to delete it because of a change in plans or campaign.
Delete Scheduled Instagram Posts on Instagram App
To delete a scheduled Reel in the Instagram native application, go to your profile and navigate to settings.
- Step 1: On your Instagram profile, tap the three horizontal lines in the top-right corner.
- Step 2: Select Scheduled Content from the menu.
- Step 3: Find the scheduled post you want to delete and tap the three dots next to it.
- Step 4: Tap Delete at the bottom of the screen.
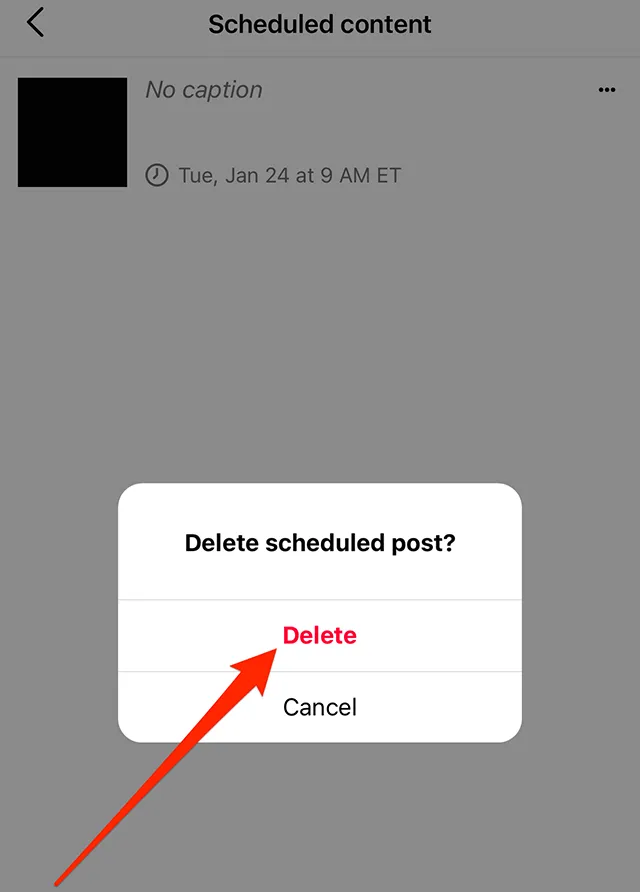
- Step 5: Confirm by tapping Delete again in the confirmation window that appears.
Delete Scheduled Posts on Meta Business Suite
Deleting your Instagram posts through Meta Business is almost similar to how you edit it. Just log into your account and go to your content.
Here are the steps that you can follow to delete your scheduled Instagram post via Meta Business Suite.
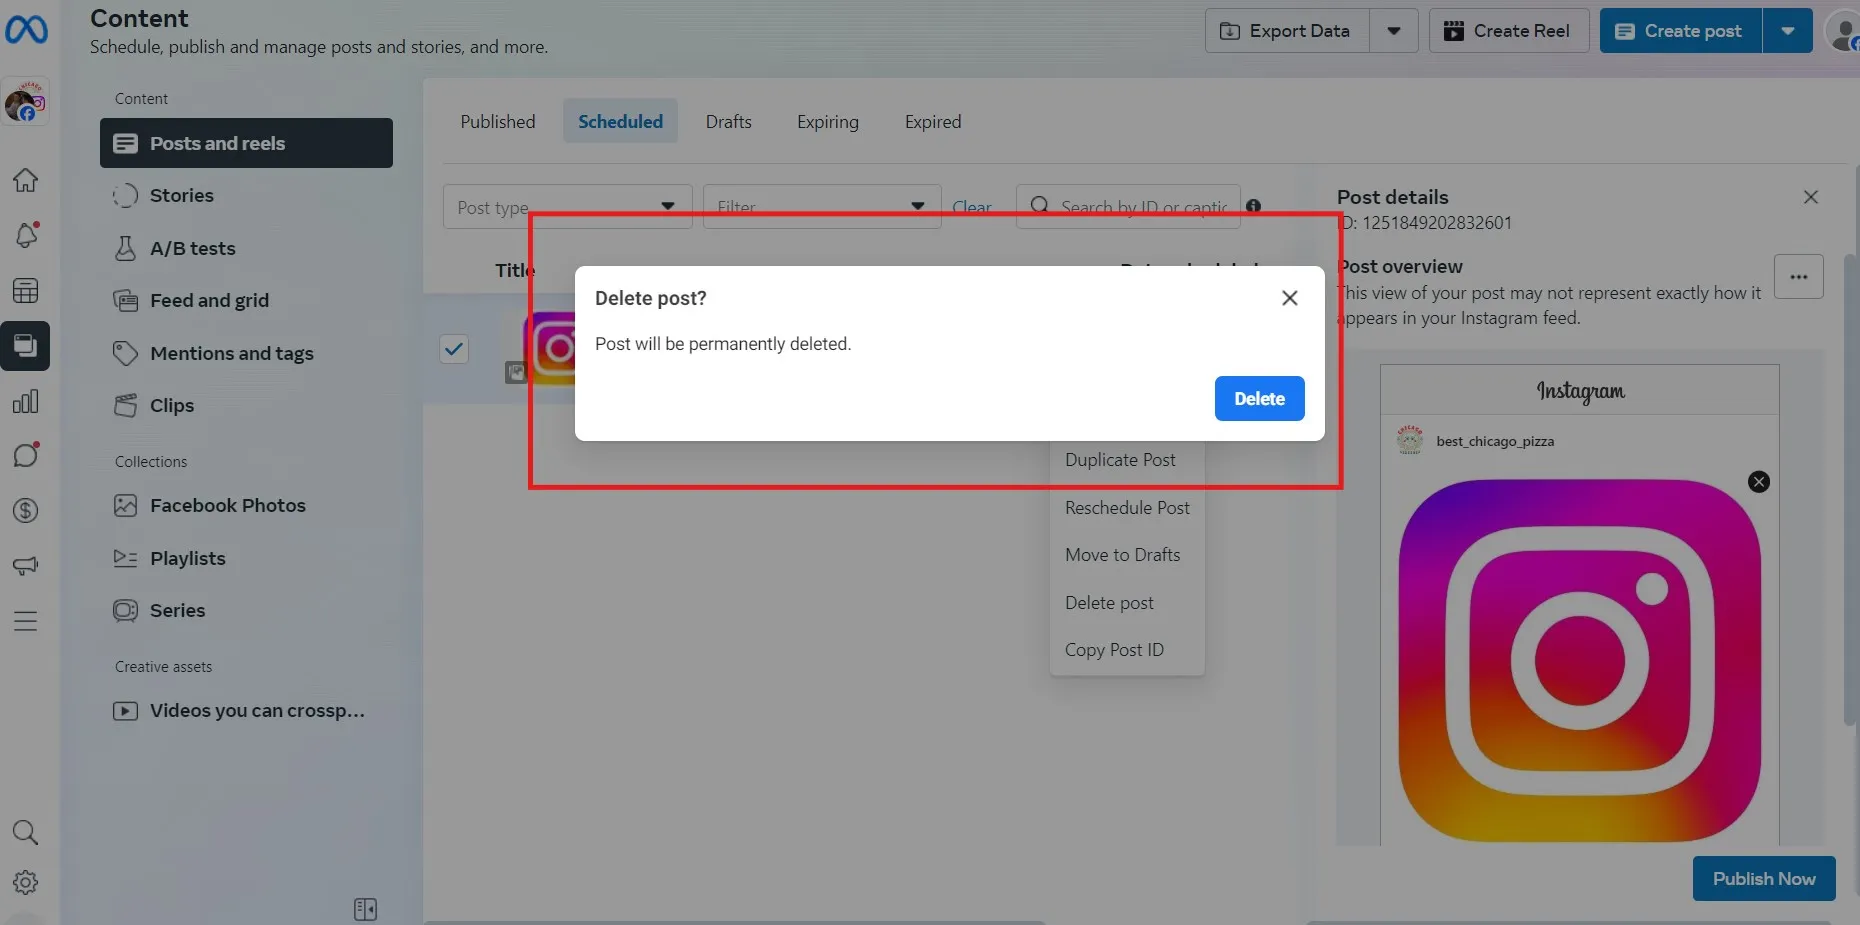
- Step 1: Go to the Scheduled section.
- Step 2: Choose the Instagram post you want to delete.
- Step 3: Tap the three dots next to the post overview.
- Step 4: Select Delete Post.
- Step 5: Confirm that you want to delete the post.
Delete Scheduled Instagram Posts on SocialPilot
While you can edit and delete your scheduled post with the Instagram native app and Meta Suite, you can do it in a much easier way with SocialPilot.
Here is how you can delete Instagram posts on SocialPilot:
- Step 1: Log in to your SocialPilot account.
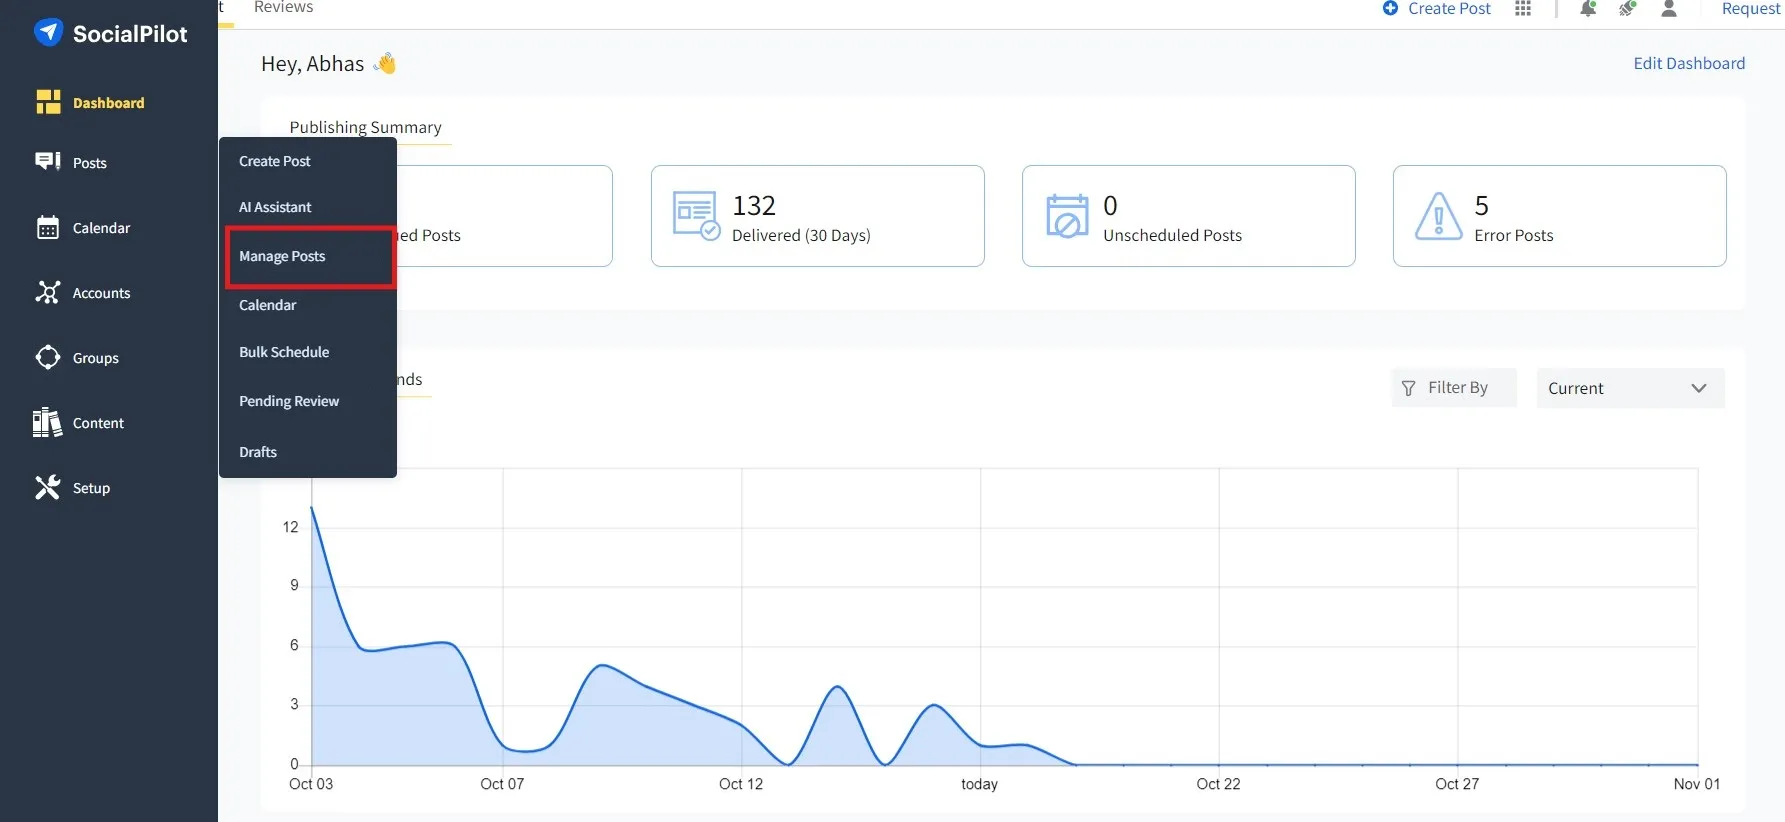
- Step 2: Go to Posts, and from there, progress to Manage Posts.
- Step 3: Go to the Pending Review section.
- Step 4: Select the posts you want to delete. Then, click the delete button on the top menu bar.
Delete Scheduled Instagram Posts on Mobile
If you find it easier to delete posts on mobile, you can do it with the SocialPilot mobile application. Here are the easy steps:
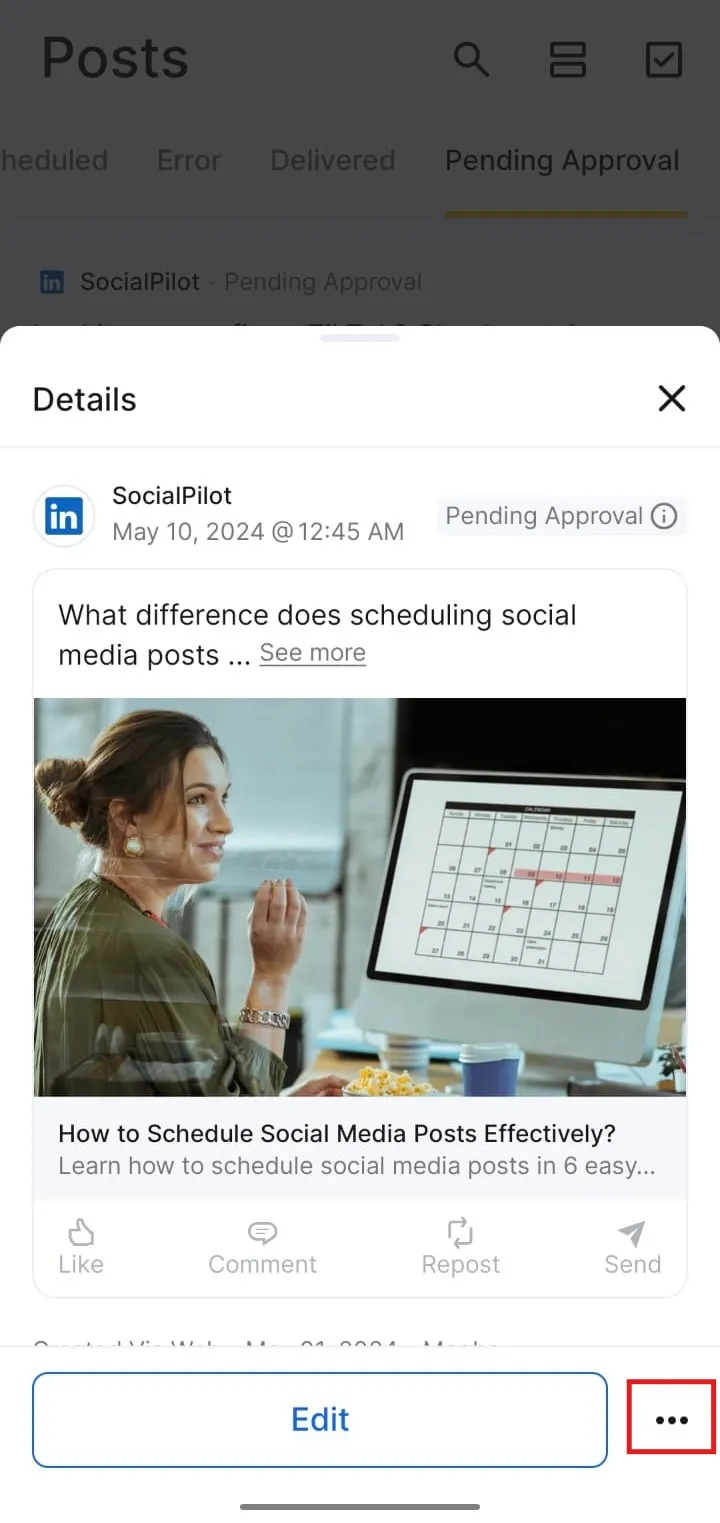
- Step 1: Log into the SocialPilot mobile application and go to the queued posts section.
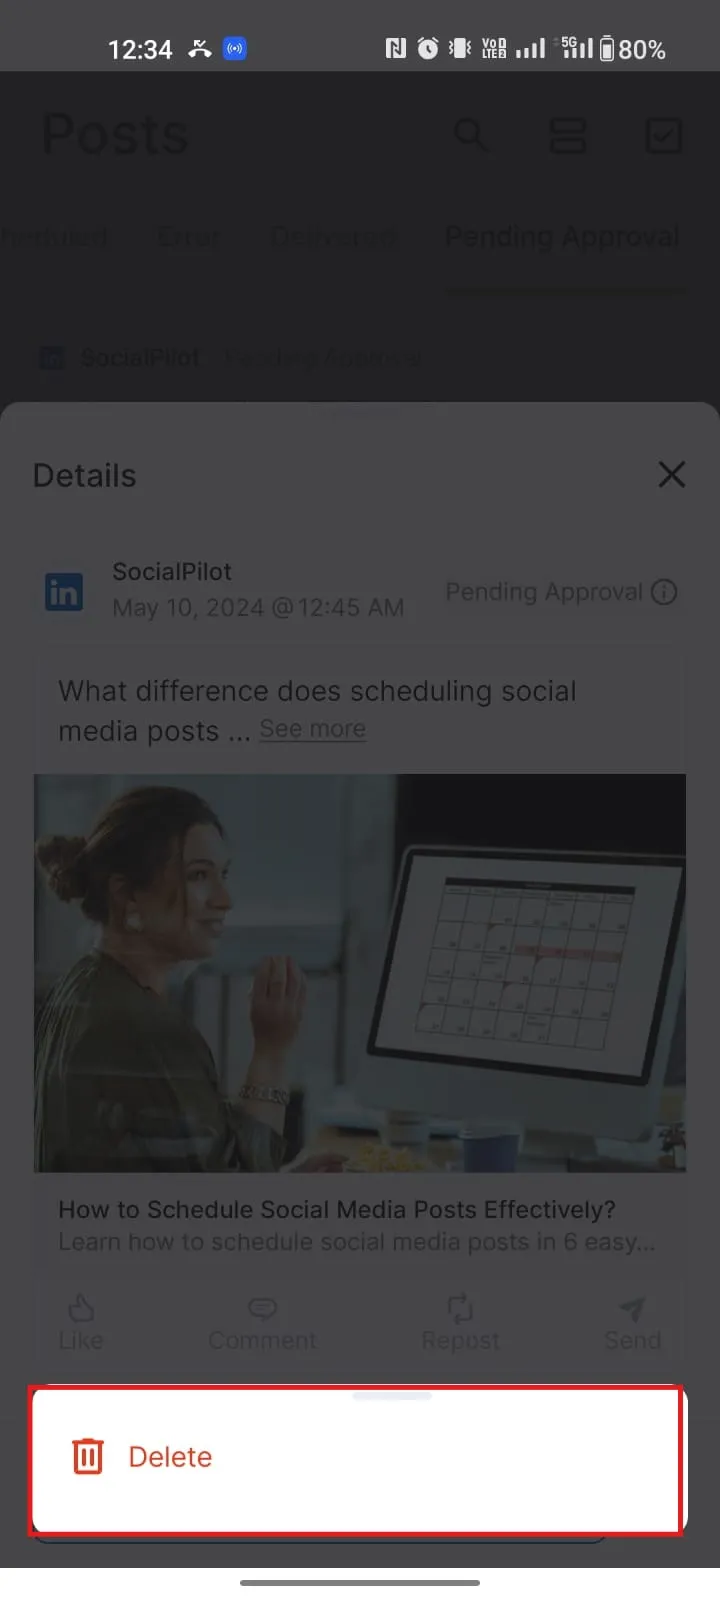
- Step 2: Find your scheduled posts. Click on the three-dot menu.
- Step 3: A pop-up will appear with the option to delete the post. Go ahead and click on the delete button.
Why Can’t I Schedule Post on Instagram
The Instagram business account offers many tools that are beneficial for content management. However, many users encounter issues while trying to schedule posts. This can be frustrating when you are trying to streamline your post scheduling. In this section will share the most common reasons behind why you can not schedule post on Instagram.
1. You Don’t Yet Have a Instagram Professional Account
While you can schedule posts and reels on Instagram, having a professional account gives you access to scheduling features. These scheduling features help you to manage your content more efficiently.
2. Your Version of Instagram Application is Outdated
You may not be able to schedule Instagram posts if your version of the application is outdated. Old versions can cause various functionalities to malfunction, including the ability to schedule posts. Updating the application can help you fix
bugs, add new features, and provide essential enhancements for seamless performance.
3. Lack of Sufficient Permissions to Use Scheduling Features
Sometimes you may not have the necessary permission to schedule posts. Access to all features, including post scheduling, is limited to account administrators or users with designated roles.
Tip for Scheduling Instagram Posts
You know how to schedule posts on Instagram now. You can finally sit back and let the tool do the publishing, right?
Not quite.
You can’t line up posts on the calendar ahead of time and expect your Instagram to flourish automatically. You need to keep a few things in mind if you want your Instagram account to prosper.
But what are they?
Don’t worry! We have curated a list of best practices and tips for Instagram scheduling for you guys.
1. Find Your Best Time to Post on Instagram
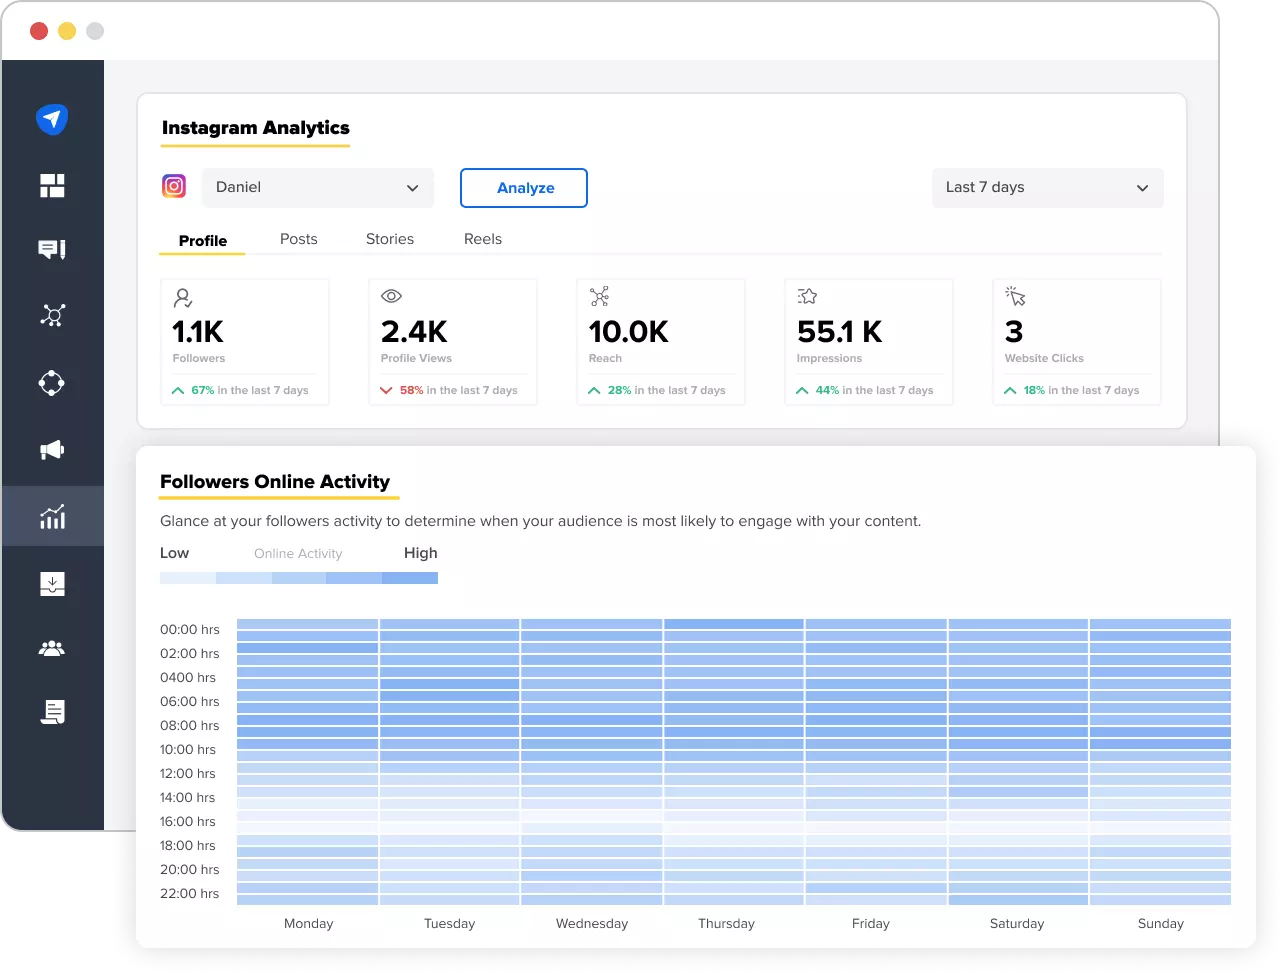
Creating quality content and scheduling your Instagram post won’t fetch you any engagement if you publish them when your audience is inactive. You must post when your audience is most active to engage with your post.
Using SocialPilot’s Followers Online Activity in Analytics, you get a heat map that analyses the average number of followers active at each hour and day of the week in the given time range to provide you with the best time to post on Instagram.
You can even access the analytics of several Instagram accounts using the advanced reports feature. This will allow you to combine the analytics of multiple social accounts so you can track them from one place.
2. Keep a close eye on Content Calendar
As mentioned earlier, don’t schedule your content and forget about it. There may be times of crisis, or your content may not align with the current social space scenario.
In such cases, you should pause your Instagram scheduling and rethink.
With SocialPilot, pausing scheduled posts is as easy as clicking the pause icon of the account in Manage Accounts.
3. Don’t Bombard with Content
The benefit of scheduling Instagram posts is that you can increase the number of your posts without sacrificing their quality.
But that doesn’t mean you over-schedule your posts. If you increase your number of posts per day, your engagement will decrease. The reason for this is you are bombarding your audience with content without giving them time to engage with it.
If you have less than or equal to 1K followers, then the optimal number of posts is twice per day. But if you post more than that, your followers will have zero time to interact with your content.
And with so much content and no time to interact, your audience will be annoyed and probably unfollow you.
Remember, it’s not the number of posts that counts. What counts is how many people interact with that post. Give your audience a breather to interact with your content.
So try not to be spammy.
4. Pay Attention to Your Captions
Even if Instagram is a visuals-focused platform, captions are equally important and deserve the attention you pay to your image posts. However, writing captions in bulk can become difficult and draining after a point of time.
In case of writer’s block, the best way to craft an effective Instagram caption within no time is to use AI caption generators. Nowadays, AI writing assistance can be utilized to create hundreds of copies at once. Other than creating, you can also repurpose and translate your well-performing captions saving you a ton of time.
5. Consider Keywords for Content
If you are going about, marketing your business on Instagram, it’s very important that you show up on the search results of your target audience. Alas, Instagram is the new Google Search for Gen-Z.
To make your posts search-optimized, add relevant keywords to your captions. This is similar to adding hashtags, which is also a given.
6. Tag Other Profiles
It is a very good idea to tag other Instagram profiles to your posts, as it gives a considerable boost to your content. Firstly, it brings in engagement by drawing attention to specific individuals or brands, and fostering interactions and discussions. It also boosts the reach of your posts, as tagged users’ followers may discover the post, leading to increased visibility and potential followers.
Overall, tagging users on Instagram posts is a powerful tool for building relationships, amplifying content reach, and fostering a sense of community within the platform.
Third-party Instagram schedulers like SocialPilot have the ability to add tags to their posts before scheduling them. So you can publish readily-optimized content on the go.
Conclusion
You need to start scheduling if you want to build a better presence on Instagram and free up more time in your busy day.
While it may appear straightforward, making the most of Instagram scheduling requires understanding the analytics of your Instagram account and how to engage followers effectively.
With the above tips and tools like SocialPilot, you can do just that and so much more!
So, what are you waiting for?

